Adding Fields
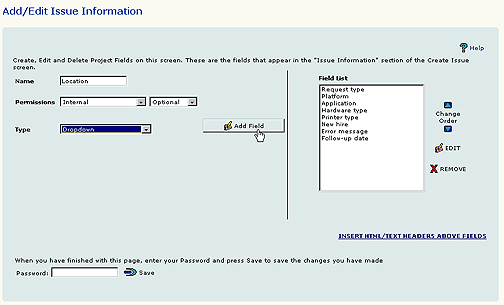
The page for adding fields to a Project is accessed by
selecting Administration
| Project | Field Maintenance from the FootPrints
Toolbar.
The following information describes the various options
on the Field
Maintenance page and the pages that you access from the Field
Maintenance page when you are adding a field.
- Name—Enter a name
for the field. This
is the name of the field in all FootPrints
forms.
- Field
Type—This
defines the type of data the field accepts. Refer to Field Types for descriptions.
- Permissions—The permission
level chosen here determines both the access and requirement for users
for the field.
- Access—This option
determines who can see the field and who can write to it.
- Internal—Only internal
Agent and administrator users (including custom Agent roles) can view
and enter data in the field. The field appears in the Create
Issue and Edit
Issue pages for internal users only.
- Public
Read-Only—Same
as internal, plus Customers can view the field data but not write to the
field. The
field appears in the Create
Issue and Edit
Issue pages for internal users. Customers
only see the data in their Requests when it is entered by an internal
user.
- Public
Read-Write—Same
as Internal, plus Customers can view the field data and enter data in
the field when creating a new Request. The
field appears in the Create
Issue and Edit
Issue pages for internal users and in the Customer Submit
Request form.
- Public
Read-Write-Edit—Same
as Public Read-Write, plus Customers with edit access can also update
the field. This option is only available if the Customer Edit license
is purchased.
- Required—The second
drop-down determines whether the field is required.
- Optional—The user has
the option to enter or not enter data in the field.
- Mandatory—The user must
enter data into the field in order for the page to be accepted if it is
submitted. If a user tries to submit an Issue without data in a
mandatory field, an error message is displayed to the user, along with
instructions to go back and enter the information. Mandatory fields
appear in red on the Create
Issue and Edit
Issue pages for internal users and in the Customer Submit
Request form.
- Field
Length—This
option applies to character single-line, integer, and real number fields
only. For these fields, the administrator has the option of defining a
field length. If
defined, users must enter data of the specified number of characters when
creating or editing an Issue or Request. Choices
for defining field length are:
- Unrestricted—No field length
restriction (the default).
- Exactly—Enter a number
in the first box for the exact number of characters users must enter in
the field. Leave the second input box blank.
- At
least—Enter
a number in the first box for the minimum number of characters field data
must contain. Leave the second input box blank.
- At
most—Enter
a number in the first box for the maximum number of characters field data
can contain. Leave the second input box blank.
- Between—Enter two numbers
defining a range of the number of characters accepted for field data.
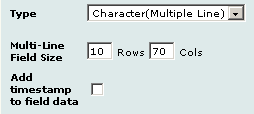
- Field
Size—Only
applies to multi-line character fields. Define the number of rows and
column for the text box. Refer
to Display
of Multi-line Fields
 . Multi-line fields are displayed in the same row with other
fields based on field size: Fields 69+ columns wide remain alone in a
row; fields 46-68 columns wide will occupy a row with 1 other field (2
fields total); fields that are 45 columns or less wide are treated like
other fields, and will be displayed with 2 other fields in a row (2 fields
total). To force a multi-line character field to take up a whole row regardless
of size, insert a <BR> tag in the field header for that field and/or
the field after it.
for additional information.
- Define
Choices—For
drop-down and multi-select field types, choices are defined in a pop-up
after adding the field (refer to Drop-down and
Multi-select Fields for additional information).
- Default
calendar link—Only
applies to Date/Time fields. From
the drop-down, select whether the field will, by default, have no link
to the personal or project calendars, be linked to the personal calendar
only, or be linked to both the personal and project calendars.
When you have completed making your selections, click
Add
Field. The
field is added to the Field
dialog box on the right. The
field is not added to the Project until you enter you password and click
 GO.
GO.

Manage fields
Restrictions on the number of fields in the Project being
added depend on the database being used. Refer
to
in the chapter on Database Administration. The
FootPrints database only allows
100 fields per project. To add contact fields, refer to Address
Book Field Maintenance.
Adding a Date/Time Stamp to Internal Fields
You can add a date/time stamp to multi-line character
fields. The
date/ time stamp is displayed beside the field when you edit the Issue
or view the Issue on the Details page. When
you create a multi-line character field by selecting Character (Multiple
Line) as the Type or edit an existing multi-line character field, a checkbox
labeled "Add timestamp to field data" is displayed. Checking
the box adds the date/time stamp.
If you use the date/time stamp option, the field acts
like the Description field in that you cannot edit existing data in the
field, only add to it.

 for additional information.
 for additional information.
 GO.
GO.
