Escalation Email
The information that is included in escalation email
can be configured to include certain fields. To
configure the default escalation email for a Project, select Administration
| Project | Escalation from the FootPrints
Toolbar, then click the Configure
Escalation Email link on the main Escalation
Setup page. To configure the email template for a particular rule
(doing this for a particular rule does not affect the template), select
Configure
in Step
4: Escalation
Actions on the Set
Up Escalation page. The
form you use to set up the escalation email is the same regardless of
whether you are configuring the email for a template or for a particular
rule.
The Specify
Email Content for Escalations page was changed significantly in
the 7.0 release of FootPrints.
However,
FootPrints is entirely backwards
compatible with earlier releases and, if you have escalation email templates
from an earlier release, they work exactly as before in release 7.0+.
If you
upgrade to a 7.0+ release and make any changes to the existing default
template, you must access each escalation rule and re-save it. In
this instance, where you have changed the default template following an
upgrade, existing escalation rules will not work unless you re-save them.
- Either select Administration
| Project | Escalation from the FootPrints
Toolbar, then click the Configure
Escalation Email link on the main Escalation
Setup page to configure the email template, or select the Configure
link in Step 4: Escalation
Actions on the Set
Up Escalation page. A
pop-up window is displayed.
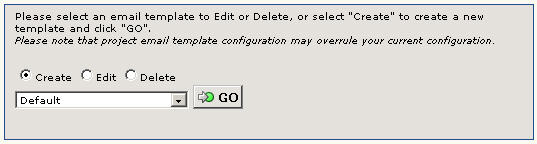
- If previous templates
have been created, you can select one to edit or delete by clicking the
appropriate radio button and then selecting the template from the drop-down
list. To
create a new template, click the Create radio button and then click GO
using the Default selection, or choose an existing template, making that
the basis for the new template, and click GO.
- Subject
of Mail—Click
the
 icon to configure the information that appears in
the Subject line of the email. The
following options are displayed.
icon to configure the information that appears in
the Subject line of the email. The
following options are displayed.
- Single
Issue notification mail—Applies
to single Issue notifications that go to Assignees or contacts.
- Summary
report mail—Applies
to summary email notifications (which may list multiple Issues).
- Allow
replies to escalations—If
the box is checked, the Issue number and project ID are included in the
subject, allowing users to respond to the email.
- Short
list of what just changed—A
summary of what was changed in the Issue that caused the email to be sent.
If you click the icon in each of the columns, a pop-up
window is displayed that allows you to specify whether to include changes
to internal Issues or Employee fields.
- Text
at top of message—Customizable
message that is displayed near the top of the notification email.
Click the
icon
to display the page to create the message. The
checkbox must also be checked in that column. The
following variables can be placed in the greeting to include the subject
of the email, the user’s name, etc.:
- · _WHONAME_ : Name
of user who created/edited Issue
- · _WHOMAIL_ : Email
address of user who created/edited Issue
- · _PROJECTNAME_ :
Project Name
- · _ENTRYTITLE_ :
Title of Issue
- · _ENTRYNUMBER_ :
Issue number
- Project
Name—The
name of the Project is displayed in the body of the notification email.
- Project
ID—Each
Project is assigned a number within FootPrints.
You can
include that number.
- Title—The Title of
the Issue is displayed in the body of the notification email.
- Issue
Number—The
Issue number is displayed in the body of the notification email.
- Link
to Details Page—A
hyperlink to the Details
page of the Issue in FootPrints (requires password authentication).
If you are using a custom login page for customers (e.g.,
group.html), that URL can be specified for Customers by clicking the  icon in the customer column and entering the URL. This does
not automatically bring the Customers to the Details
page of their Issue; after entering their email address, the main customer
page is displayed. Contact
Numara Software for details on turning
the custom customer login page into a Perl script that directly displays
the details of their Request when using the hyperlink.
icon in the customer column and entering the URL. This does
not automatically bring the Customers to the Details
page of their Issue; after entering their email address, the main customer
page is displayed. Contact
Numara Software for details on turning
the custom customer login page into a Perl script that directly displays
the details of their Request when using the hyperlink.
- Last
Edit Date—The
last date the Issue was edited.
- Last
Edit Time—The
last time the Issue was edited.
- Priority—The priority
of the Issue.
- Status—The current
status of the Issue.
- Creation
Date—The
date on which the Issue was created.
- Creation
Time—The
time at which the Issue was created.
- Creator—The submitter
of the Issue.
- Show
Subtask or Global Entry Relationship—If
the Issue is a Master, Subtask, Global, or GlobalLink, include this reference
in the email.
- Description—The Issue's
description, with time/date/user stamps. Two options are available
by clicking the icon: Most
Recent Description and All
Descriptions.
- Assignees—The list of
users/Teams assigned to the Issue.
- CC's—Any email addresses
that are listed in the CC
section of the Issue. Both
permanent and one-time CCs are shown, denoted by one of these labels:
(permanent); (permanent,
but not CC'd on this edit);
(this
edit only)
- Issue
Information—Project
field data. By default, customers only see Public fields and internal
users see all fields. Individual
fields can be selected for inclusion by clicking .
- Address
Book Fields—Address
Book data. By default, customers only see Public fields and internal
users see all fields. Individual
fields can be selected for inclusion by clicking .
- List
attached files—A
list of files attached to the Issue are displayed in the body of the email.
- Attach
attached files—Attached
files are sent with the escalation email.
- Complete
Issue History—A
summary of the Issue's history appears in the body of the escalation email.
- Text
at bottom of message—Customizable
message that appears at the end of the escalation email. A different
message can be made for each type of mail by clicking the icon in that column, entering the message in the text box,
and clicking
 GO. The checkbox must also be checked
in the column. In addition, variables can be placed in the greeting
to include the subject of the email, the user’s name, etc. The Text
at top of message option above describes
the variables.
GO. The checkbox must also be checked
in the column. In addition, variables can be placed in the greeting
to include the subject of the email, the user’s name, etc. The Text
at top of message option above describes
the variables.
- Send
mail as text—Notification
mail is sent as plain text.
- Send
mail as html—Notification
mail is sent in HTML format.
If both text and html are checked, FootPrints includes
both formats in the message. For
most Windows-type email readers (Outlook, Lotus Notes, etc.), only the
HTML is seen.
- Custom
formatting for text message—Create
a custom email template for FootPrints escalation email layout
and custom formatting in plain text (refer to Custom
Email Templates).
- Custom
formatting for HTML message—Create
a custom email template for FootPrints escalation email layout
and custom formatting in HTML (refer to Custom
Email Templates).
For Issue Information and Address Book fields, custom email
template settings override settings you specify on this page, regardless
of whether the custom formatting is for text or HTML messages. For
example, if your Specify Email Content page specifies that the message
is to contain only public fields in the Issue Information section and
you specify an internal field in the custom email template, the custom
email template overrides the other settings. Refer
to Custom Email Templates for details
on how to include the settings on this page with the custom email.
- Enter a name at the
bottom of the page under which this escalation email is to be saved.
- When you are finished
configuring the template, click
 SAVE.
SAVE.
When you have finished configuring the escalation email
template, it includes the fields and other options selected for the escalation
rules that use this template. Escalation
email notifications are flagged with the "Urgent" flag (!) in Microsoft Outlook and Lotus Notes.