Setting up an Escalation Rule
This section covers the following steps to create an
escalation:
- Step
1: Basic Escalation Options—Name
the escalation rule and specify if it should be turned on.
- Step
2: Escalation Type—Define
the type of escalation.
- Step 3: Additional Criteria—Select criteria
used to escalate Issues.
- Step 4: Escalation Action(s)—Select one
or more actions to occur when an Issue meets the escalation criteria.
- Step
5: When to Run Escalation—Choose
when an Issue should be checked to see if it meets the escalation criteria.
- Step
6: Create New Escalation—Save the escalation
information.
Master Issues cannot be closed by an escalation rule.
Step 1: Basic Escalation Options
- Escalation
Name—Give
a name to the escalation rule, for example, Gold
Level Issues.
- Escalation
On/Off—To
activate this escalation rule, the On
radio button must be selected (the default). If an escalation rule
is turned off, the settings are saved until the rule is re-activated or
deleted.

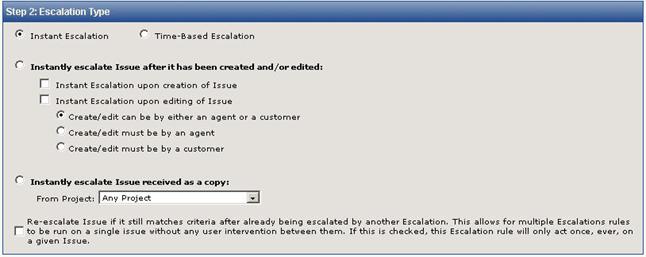
Step 2: Escalation Type
There are two kinds of escalation rules: instant and
time-based. Instant
escalation rules are run at the time an Issue is created,edited, or both.
Time-based
escalations are only applied after an Issue has remained open or unedited
for a specified amount of time. Depending
on which option is chosen, a number of sub-options are available.
- Instant
Escalation—If
you select this option, one of the following additional options can be
selected. Note that, when an escalation is based on a status change, if there is a status change for a Global Issue and it changes all of the linked Issues, this is problematic when the escalation is instant. Therefore, that type of escalation must be time-based not instant:
- Instantly
escalate Issue after it has been created and/or edited—Choose
one or both of the following:
- Instant Escalation
upon creation of Issue
- Instant Escalation
upon editing of Issue
- Instantly
escalate Issue received as a copy:
- From
Project—Specify
the project from which the Issue is being received to trigger the escalation.
- Time-Based
Escalation—If
you select this option, the following additional options become available
(only one can be selected):
- Time
unedited/Age—Select
the amount of time that must pass since the Issue was created (Age) or
since anyone edited it (Time unedited) before it is escalated. Minute,
hour, day, and week increments are available. Combinations of hours,
minutes, days, and weeks can be selected. The
time is based on a 24/7 schedule.
The "Age" option is not available in the FootPrints database versions.
- Time
unedited/Age based on “Work Time”—This
option also counts the time since an Issue was created or last edited,
but uses the project Work Calendar rather than the standard 24/7 schedule.
Regular working days and hours, as well as holidays, can be configured
for the organization by clicking the link for Work
time or by selecting Work
Calendar from the Project Administration page. When using the Work
Calendar, only one unit of time can be chosen (minutes, hours, or days).
Complete instructions for the
can be found earlier in this chapter.
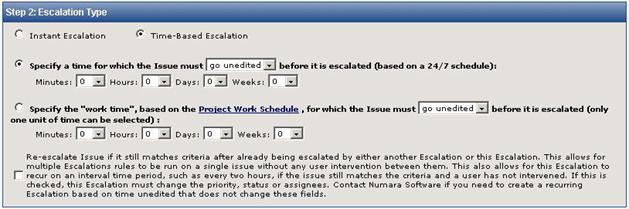
- Re-escalate
Issue—This
option applies to both types of escalations. When selected, the system
will apply or re-apply the escalation rule to an already escalated Issue.
Recurring age-based escalations are also allowed; each escalation will
only run once when the Issue sufficiently ages. So, for example, you can
create separate age-based recurring escalation rules for 5 minutes, 10
minutes, 1 hour, 2 hours, and 1 week, and each escalation rule will only
be applied once to an Issue when it is sufficiently aged for that rule.
Example:
- The support hours
are Monday-Friday from 8am to 6pm (as configured in the project Work Calendar).
- An escalation rule
states that an Issue must be unedited for 6 hours before it is escalated.
- A new Issue comes
in at 4pm on Friday.
In the above case, the Issue will be escalated
at 12pm on Monday (6 working hours later).
Step 3: Additional Criteria
The criteria chosen here determine which Issues are automatically
escalated. Available criteria include virtually all options that
appears on the Advanced
Search page, including Status,
Priority,
Assignee,
Project fields, Address Book fields, etc. (see the section on
for more information).
If your rule requires that Create/edit must be by an agent,
but a Customer Request status (such as Request) is used as a criterion
for escalating an Issue, then it becomes possible for Customer Requests
to be escalated (i.e., an escalation created by a Customer).
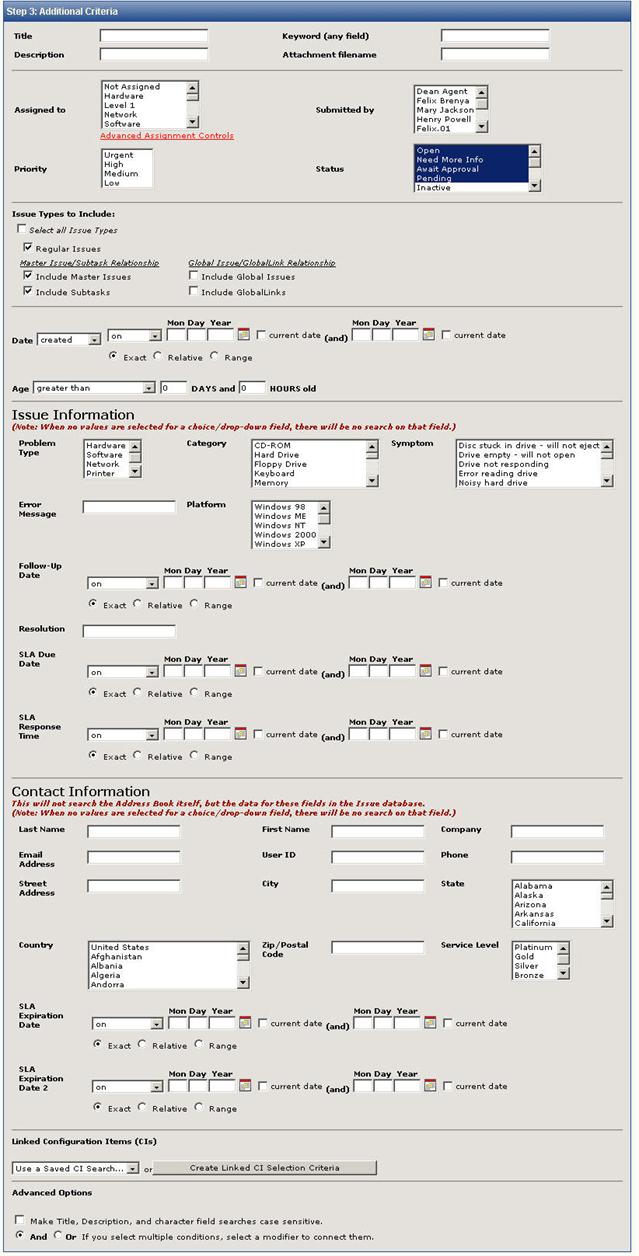
Select the criteria for this escalation
rule
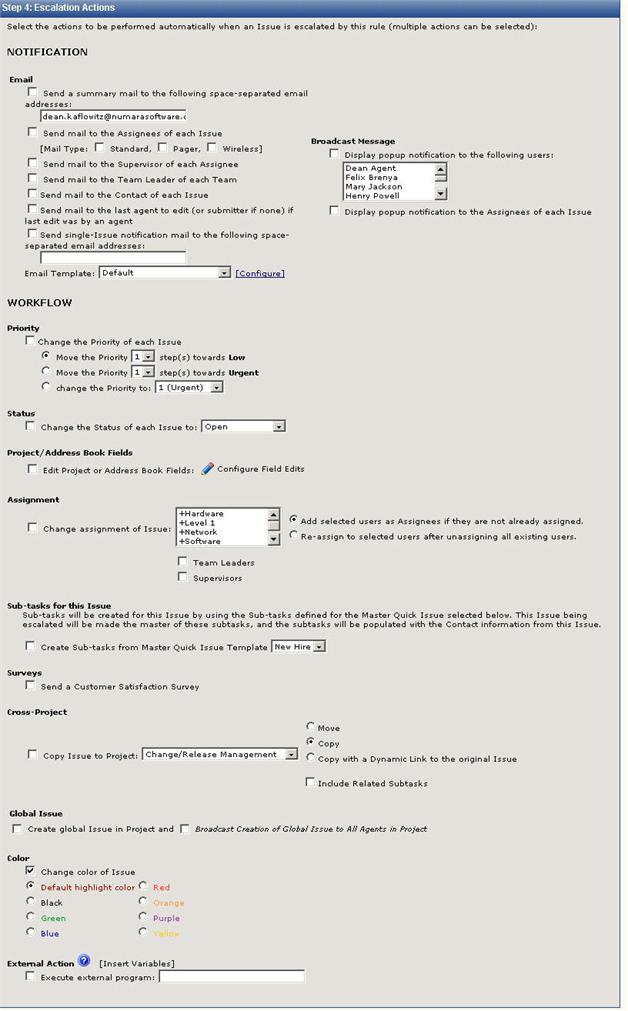
Step 4: Escalation Actions
- Notification
- Email—One or more email actions can be selected.
- Send
a summary mail—When
the escalation routine is run and matches are found, an email is sent
to the specified addresses. The
email contains a summary of escalated Issues for the Project. If
you enter multiple email addresses, separate the addresses with a space.
Summary
mails are not coded to use uploaded custom formatted files. To
use an uploaded mail template, edit the escalation to modify Email Notification
from "Send a summary mail to ...." to "Send Single Issue
notification mail to ..."
- Send
mail to Assignees—When
an Issues is escalated, an email is sent to all Assignees of each escalated
Issue. Select the email address type to use for this escalation
rule:
- Agent—the Agent's
agent email address.
- Pager—the Agent's
pager email
address.
- Wireless—the Agent's
wireless email address.
The different email address types are defined for each user
on the Edit
Agent Administration page, or on the My
Preferences page by the Agent.
- Send
mail to the Supervisor of each Assignee—An email is
sent to the Assignees' Supervisor(s). Refer
to Add Agents or Edit
Agent User for information
on designating Supervisors.
- Send
mail to the Team Leader of each Team—An email is
sent to each Team's Team Leader. Refer to Creating Teams for information on designating
Team Leaders.
- Send
mail to Contact—An
email is sent to the Customer contact for the escalated Issue.
- Send
mail to the last agent to edit (or submitter if none) if last edit was
by an agent—An
email is sent to either the last agent to edit the Issue or, if no editing
has been done on the Issue, send mail to the person who submitted the
Issue.
- Send
single-Issue notification mail to the following space-separated email
addresses—Send
an email to the specified email addresses only once for this escalation.
- Email Template—Select or define
an email template to be used for this escalation. If
you elect to configure an email template, you can refer to Escalation Email for further
instructions.
- Broadcast Message—One or more broadcast message types can be
selected.
- Display
pop-up notification to the following users—Specify
a user or users to receive a broadcast message from FootPrints.
- Display
pop-up notification to the Assignees—Agents
assigned to the escalated Issues receive a broadcast message from FootPrints.
- Workflow—One or more
workflow actions can be selected.
- Priority—Automatically
raises or lowers the Issue’s priority as specified. You can also
change the priority of all escalated Issues to a specific priority.
- Status—Automatically
change the status of the escalated Issue.
- Project/Address
Book Fields—Automatically
change specified Project/Address Book fields. If
you check this box, you must click the Click
here to configure field edits link to specify the changes.
- Click
here to configure field edits—This
page allows you to update Project and Address Book fields via an escalation. In addition to editing other fields, you can change the Title field or append a description to the Description field.
Fill in
the fields with the appropriate data and then click the "GO"
button.
- Add field variables on left to target fields on right—This feature allows you to populate a field with the value from another field upon escalation. Select a field from the left drop-down and then select a field from the right drop-down. When an Issue is escalated, the field in the right drop-down is populated with the value of the field in the left drop-down.
- Address
Book Fields—Specify
the changes to be made to Address Book fields upon escalation, i.e., select
the data that is to populate the field after the escalation. If
you do not change a field, it is unchanged after the escalation.
- Project
Fields—Specify
the changes to be made to Project fields upon escalation, i.e., select
the data that is to populate the field after the escalation. If
you do not change a field, it is unchanged after the escalation.
If you notice that dependent fields are being displayed with
a null value when an escalated Issue is edited, it may be that the dependent
field was configured with an incorrect value in the escalation rule. If
you configure a dependent field to be changed to an invalid choice as
a result of an escalation, the dependent field is populated with null
data. For
example, if the first field were set to Software
and the dependent field were changed to Printer
when escalated, and Printer
is not a valid choice for the Software
dependent drop-down, when the Issue is edited, the dependent field will
show no selection. The
drop-down for the dependent field will contain the normal, valid choices,
so it can be corrected at that time. To
correct the problem at its source, edit the escalation rule and replace
the incorrect choice with the correct choice.
- Assignment—Highlighted
users are assigned to the escalated Issue. If Add
Selected Users is chosen, the original assignees of the Issue remain
assigned. If Re-Assign
is chosen, the original assignees are unassigned. Teams and/or individual
users can be selected. Re-assignment
can also automatically be made to Team Leaders or Assignees' Supervisor(s)
by checking the appropriate box.
- Sub-tasks
for this Issue—Automatically
creates sub-tasks for the Issue using the Master Quick Issue template
that you select from the drop-down list.
Sub-tasks are not created for an escalated Issue if the Issue
is itself a sub-task, a GlobalLink, a Global Issue, or a Solution.
- Cross-project—The Issue is
automatically copied or moved to the Project specified. If Copy
with a Dynamic Link is selected, the Issues update each other when
field data changes. If
Include Related Subtasks is checked, then when a Master Issue is copied
or moved across Projects, the related subtasks are also copied or moved.
Subtasks are not accepted by the receiving Project
unless the receiving Project is configured for Cross-project copy/move
of subtasks. Refer
to the topic for Issue Workflow for more
information on setting this option.
- Color—The Issue is
displayed on the FootPrints Homepage
with the specified color.
- External
Action—An
external application can be run by the rule. This
feature is especially useful for running scripts. The
application must be one that can run and stop on its own without any user
intervention. In
addition, if the program involves running a graphical user interface (GUI),
it may not be able to display the interface to a screen, which could cause
the application to hang and fail. Therefore,
the application should also be one that can run from a command line rather
than a GUI. Enter
the full path to the program, e.g., D:\Programs\AppLite\applite.exe.
Some field data from the escalated Issue can also be passed to the program
as arguments:
- Issue
Number—%%MRID%%
- Title—%%Title%%
- Priority—%%Priority%%
- Status—%%Status%%
- Submitter—%%SUBMITTER%%
- Project
ID—%%PROJID%%
- Project
and Address Book fields—%%FIELD
NAME%% where "FIELD NAME" is the name of the field in upper
case.
External actions run applications from the
CGI directory. Make
sure that directory has permission to run the application or the external
action will fail.
i. Surveys—If checked, a customer satisfaction survey is sent to the contact when the escalation occurs.
- When to
Run Escalation
- Any
Time—Escalate
the Issue at the moment the Issue is found to match escalation criteria.
- Follow-the-Sun—Run at the
time and on the days specified. You
can also specify multiple times.
Unassigning One Agent While Keeping the Rest Assigned
The administrator may need to build an escalation in
which one agent, who is always the same agent, is removed from the assignments
list while others, who vary from Issue to Issue, remain assigned to the
Issue. In
this instance, it would not be possible to use the standard escalations
page to unassign everyone and then re-assign the Issue because the agents
who are to remain would vary from Issue to Issue. An
example where this might be needed is in the case of an Issue requiring
an approval. The
approver might be the same agent every time, but the other assignees could
vary. This
re-assignment can be accomplished via an escalation, but not by using
the Assigment section of Step 4: Escalation Actions. Instead,
you would use the External Action function to run a command from FootPrints'
API. To
do so, specify the following as an external action:
C:\footprints\bin\perl\bin\perl C:\footprints\bin\mrUnassign.pl
%%MRID%% userID
Step 5: When to Run Escalation
Choose when to check an Issue against escalation criteria.
There are two options:
- Anytime—The escalation
can be run at any time (the default).
- Follow
the Sun—"Follow
the Sun" escalations allows you to assign or reassign Issues to Agents
in different locations and time zones depending on the time of day or
day of the week that the Issue is created or escalated. The
time and day specified here are based on the FootPrints
server time. This
integrates the escalation time on the server with when the escalation
rule is to be applied. Some
examples are:
- Escalate Issues
received off hours to someone's pager (time intervals when support team
is not available).
- Escalate Issues
and route them based on the time of day, e.g., Issues submitted 9am-5pm
EST are routed to the East Coast US Help Desk; those submitted 5pm-1am
EST are routed to the Tokyo Help Desk; those received 1am-9am EST are
routed to the London Help Desk.
To set Follow the Sun criteria:
- Select Follow
the Sun.
- Select the time range
for the escalation rule.
- If this escalation
should run during a span of time that includes a change of date, you must
specify the time spanned during both dates in order to cover the entire
period. For
example, the four hours between 8:00pm and 2:00am can be covered by selecting
8:00pm-11:59pm above and, additionally, Midnight-2:00am in the second
set of time criteria.
- Check the boxes corresponding
to the days of the week that the escalation is required to run.

Step 6: Create New Escalation
After criteria and actions are chosen, enter your password
and click  GO; the
escalation rule is enabled. When an Issue matches the criteria of
the rule, the specified actions occur. If an escalation rule fails
for any reason, the Project Administrator receives an email notification.
GO; the
escalation rule is enabled. When an Issue matches the criteria of
the rule, the specified actions occur. If an escalation rule fails
for any reason, the Project Administrator receives an email notification.
Escalated Issues lose their urgent status once they are edited.
If an Issue is reported as escalated, it is not escalated again until
it has lost its urgency (by being edited) and then becomes urgent again.
The exception to this is if Re-escalate
Issue is selected under the Time
criteria.
Scheduler Service
Escalations are run by the FootPrints Scheduler
service. On Windows, FPSchedule.exe
is automatically set as a service on the FootPrints server. On
UNIX, a cron
job is automatically created that runs the MRrunScheduledScripts.pl
file. This service handles incoming email, outgoing email notification,
escalations, mass emails, and scheduled reports.