Relationships
Relationships are defined as "To" and "From" which denote dependency. The dependent CI is the "To" CI and the CI upon which it depends is the "From". For example, if a sever goes down, it affects the PC, but if the PC goes down, it doesn't affect the server. In this example, the relationship is "From" the server "To" the PC. The Relationships option is used to define these relationships, which can be viewed as text or as a figure.
Add a Relationship
To add a relationship:
- Select Administration | Relationships. The Relationship Configuration page is displayed.
- Next to the Relationship field, click the
 Add button. The Relationship Editor is displayed.
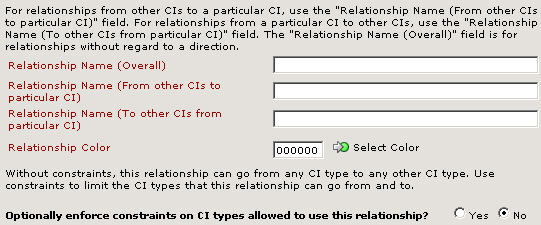
- The following fields are mandatory in the Relationships Editor:
- Relationship Name (Overall)—Enter a name for this relationship.
- Relationship Name (From other CIs to particular CI)—Enter a name for the relationship from the CI. For example, if you are setting up an email server relationship, the "From" would be from the email server and might be named "Email Server".
- Relationship Name (To other CIs from particular CI)—Enter a relationship name for the dependent CI. For example, is you are setting up an email server relationship, the "To" would be the email client and might be named "Email Client".
- Relationship Color—Select a color for the relationship. When a visualization of the relationship is displayed, the line between CIs in the relationship is displayed in the color you specify here.
- Enforce constraints on CI types allowed to use this relationship?—If you select no, any CI can use this relationship. If you select Yes, fields are opened for you to specify which CIs can use the relationship.
- Constraints—Allow this relationship From and To the following CI Types—Specify the permitted CIs in the From drop-down field and the permitted CIs in the To drop-down field, then click the Add button. If you decide to delete a CI constraint, click on the line containing the CI specifications and then click the
 Delete button beside the CI specification.
- When you have completed the relationship definition, click the
 Save button. The relationship name is displayed in the Relationship field.
Edit a Relationship
To edit a relationship:
- Select Administration | Relationships. The Relationship Configuration page is displayed.
- Click on the name of the relationship you want to edit in the Relationship field.
- Next to the Relationship field, click the
 Edit button. The Relationship Editor is displayed. Refer to step 3 in the Add a Relationship procedure above for details on the fields.
- When you have completed your edits, click the Save button.
Delete a Relationship
To delete a relationship:
- Select Administration | Relationships. The Relationship Configuration page is displayed.
- Click on the relationship you want to delete in the Relationships field.
- Click the Delete button. A confirmation pop-up window is displayed into which you must enter your password in order to complete the deletion.
- Enter your password and click the
 GO button. The relationship is deleted and is no longer displayed in the Relationships field.