Project Wizard Step 4c–Exchange/Active
Directory Field Mapping
If the test to connect to the Exchange/Active Directory
server is successful, the Field Mapping page is displayed. On this page,
you can map attributes from your Exchange/Active Directory server to the
FootPrints Address Book.
- Available
LDAP/Exchange Attributes—A
list of available Exchange/Active Directory Attributes is in the LDAP
Attribute drop-down box. These are attributes found on the Exchange/Active
Directory server based upon the search base provided in your LDAP configuration. To
see an explanation of the most common Exchange/Active Directory attributes,
click the small Help link above the attribute list.
- FootPrints
Field Names—The
right side of the page contains a list of some default fields. All of
the fields in the Address Book schema for the template are highlighted.
When one of the field names is highlighted and then Edit is clicked, the
LDAP Attribute drop-down box is populated with either a recommended name
or the name of the Exchange/Active Directory attribute. Regardless
of what appears in the box, you can change the name of the field.
In addition, the Field Type contains a recommended FootPrints field
type, which can also be changed. You
cannot use the same attribute for more than one field.
- For each field, select
an available Exchange/Active Directory attribute from the drop-down.
- If there is no corresponding
attribute for the field, select Delete.
This deletes the field from the Address Book in FootPrints.
- Although some Exchange/Active
Directory attributes are obvious in how they relate to the FootPrints
Address Book fields, others
are not. The Exchange/Active Directory administrator should assist
in mapping attributes to FootPrints Address
Book fields.
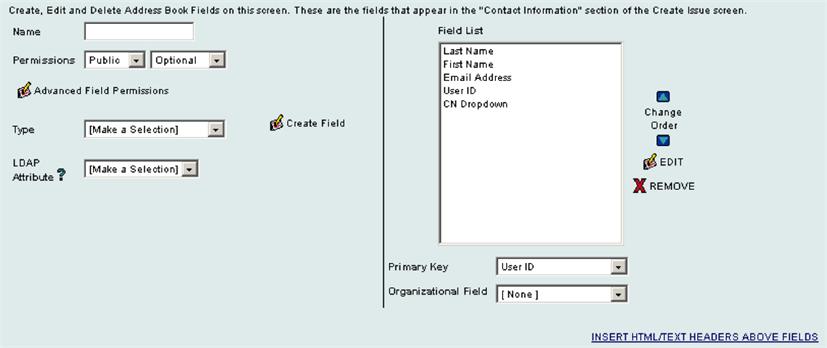
On this screen, any additional changes desired can be
made to the Exchange/Active Directory Address Book fields.
Once you have completed changes in name or field type,
click Add
Field to send the field to the FootPrints Fields box.
- FootPrints
Fields—The
FootPrints Fields box contains all fields currently selected.
- Primary
Key—The
Primary Key is a unique identifier for each Contact in your Address Book.
If the Customer Self-service feature is used, it is the ID that Customers
use to log into FootPrints, along
with a password. This field should be both present and unique to all Contacts.
User
ID is the recommended field and also the default for all templates.
- Organizational
Unit—The
Organizational Unit is used to organize Contacts in the Address Book.
Examples include Department,
Business
Unit, or Company.
It is an
optional property. If
an Organizational Unit is selected, the Contacts in the Address Book are
grouped by that field.
To re-order the fields:
- Select a field in
the dialog box (it will be highlighted in blue).
- Use the Up and Down
arrow buttons to move a field up and down in the list.
- Continue to re-order
the fields are desired. This is the order in which they are displayed
in the Address Book.
To delete a field:
- Select the field
in the dialog box (it will be highlighted in blue).
- Click Delete.
The field
is removed from the dialog and is no longer included in the Address Book.
Add a field from Active Directory
to FootPrints
When
you have finished making any changes desired to the Exchange/Active Directory
Address Book fields, click  Next.
Next.
Proceed to Step 5