Numara FootPrints Sync
Numara FootPrints Sync supports the following:
- Supported Operating Systems: Windows XP Pro, Windows XP Home, Windows 2000, Windows 2003 Server
- Supported Personal Information Manager (PIM) software: Microsoft Outlook, Microsoft Outlook Express, Lotus Notes, Palm Desktop, Palm HotSync
- Supported Personal Digital Assistants (PDAs): PocketPC (through Outlook), BlackBerry (through Outlook or Lotus Notes), Palm (through Palm Hotsync or Palm Desktop)
Install the Desktop Client
FootPrints Sync is an add-on module and must be purchased
separately. It
is only available to Agents and Administrators, not Customers.
To install the FootPrints Sync client:
- Select
 My Preferences from
the FootPrints Toolbar, then select FootPrints Sync (2-way) from the FootPrints Sync section of the main frame. Select
My Preferences from
the FootPrints Toolbar, then select FootPrints Sync (2-way) from the FootPrints Sync section of the main frame. Select  Configure FootPrints Sync
Settings from the FootPrints Sync
section. The
FootPrints Sync page is displayed.
Configure FootPrints Sync
Settings from the FootPrints Sync
section. The
FootPrints Sync page is displayed.
- Click the Download
the FootPrints Sync client link on this page to access the client.
You can
choose to open and run the client installation or download it and run
it.
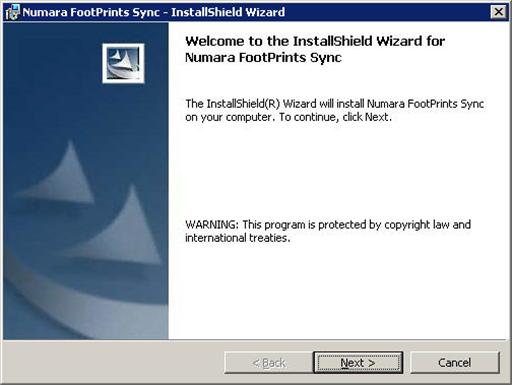
- Double-click the FootPrints Sync file (FPSync.exe) that you just downloaded to start the FootPrints Sync InstallShield Wizard. The
Welcome screen is displayed.
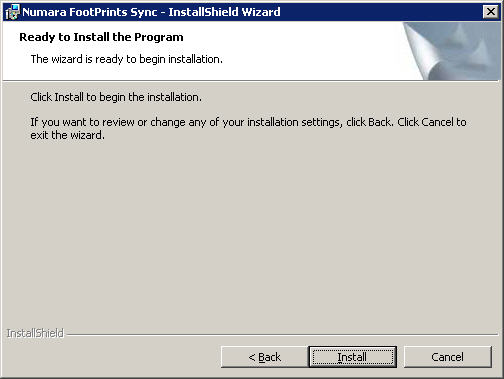
- Click the Next button
to continue. The
Program Maintenance window is displayed.
- Click the Install
button to install the client. When
installation is completed, the Completed window is displayed.
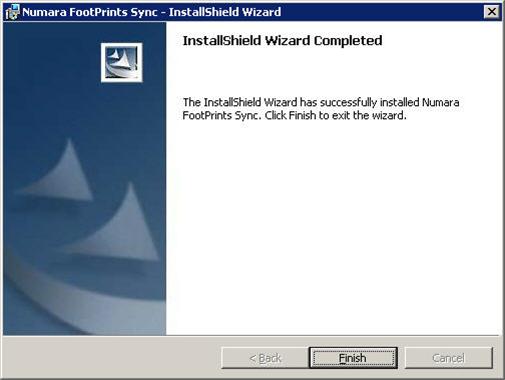
- Click
the Finish button to finish the installation.
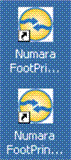
Once installation is complete, there should be two icons
on your desktop, one called FootPrints Sync Setup and one called simply
FootPrints Sync. In addition, the Sync client is displayed. If it is not, double-click
on either icon to display the FootPrints Sync client. Details
on configuring and using the FootPrints Sync desktop client are below.
Uninstall the FootPrints Sync Desktop Client
To uninstall the FootPrints Sync Client:
- Start the FPSync.exe
file (the same file you used to install the FootPrints Sync client).
- Once the Welcome
window is displayed, click the Next button.
- In the Program Maintenance
window, click the Remove radio button, then click the Next button. The
client is removed.
Configuring FootPrints Sync Settings Within FootPrints
These settings configure how FootPrints:
- handles appointments made in FootPrints
or made in the PIM,
- synchronizes FootPrints
Issues with PIM tasks and vice versa,
- and maps contact fields between
FootPrints and the PIM.
Some
PIMs have a concept of “private” and “public” calendars, similar to the
FootPrints personal calendar and
project calendar. A private calendar is viewable only by the PIM
owner, but the public calendar can be seen by others, with the owner’s
permission.
When Numara FootPrints Sync initially synchronizes FootPrints
assignments with the tasks list, it takes role permissions into consideration.
Only the
agent's own assignments or team assignments are synchronized. However,
if the agent's role only permits him or her to edit his or her own assignments
through the FootPrints interface, the agent will be able to close and
add to the Description field of the teams assignments through the PIM.
Administrators
must be aware of this if they are to restrict agents from editing team
assignments and, in that circumstance, may wish to restrict use of Numara
FootPrints Sync.
Enabling synchronization and defining the PIM are done
in the client installation. The following options only apply when synchronization
is enabled in the client.
To enable FootPrints Sync in FootPrints and open the FootPrints Sync
page for configuration:
- Select My Preferences from
the FootPrints Toolbar.
- Select FootPrints
Sync (2-way). If
you want to continue to use the 1-way FootPrints Sync, which only synchronizes
calendar appointments with your Outlook Calendar and does so only from
FootPrints to Outlook, select Manual Calendar Sync (1-way). If
you choose 1-way synchronization, continue no further with this procedure.

- Select Configure
FootPrints Sync Settings from the FootPrints Sync
section. The
FootPrints Sync page is displayed.
You can select options from the FootPrints Sync page
as follows:
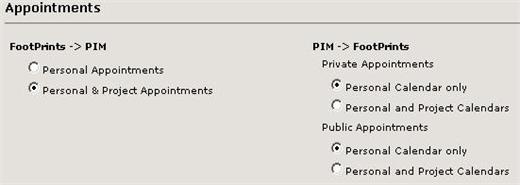
- FootPrints
-> PIM—Tell FootPrints
how to handle appointments created in FootPrints
when writing them to the PIM.
- Personal
Appointments—Only write FootPrints personal calendar appointments
to the PIM.
- Personal
& Project Appointments— Write appointments from the FootPrints
personal calendar and the project calendar to the PIM.
- PIM
-> FootPrints—Tell FootPrints
how to handle appointments created in the PIM when writing them to the
FootPrints calendar.
- Private
Appointments—Tell FootPrints
how to handle private appointments created in the PIM when writing them
to FootPrints.
- Personal
Calendar Only—Write private appointments from the PIM to the FootPrints personal calendar only.
- Personal
and Project Calendars—Write private appointments from the PIM to
the FootPrints personal and project
calendars.
Because FootPrints
has no way of knowing when a user is one of many invitees to an appointment,
if multiple invitees to a single appointment synchronize their Outlook
calendars to the FootPrints project
calendar, the same appointment will appear multiple times in the FootPrints project calendar. To
avoid this problem, invitees (but not the originator) to such an appointment
should temporarily turn off synchronization to the Personal
& Project Calendars and, instead, synchronize only with the
personal calendar.
- Public
Appointments— Tell FootPrints
how to handle public appointments created in the PIM when writing them
to FootPrints.
- Personal Calendar Only—Write public appointments from the PIM to the
FootPrints personal calendar only.
- Personal
and Project Calendars—Write public appointments from the PIM
to the FootPrints personal and
project calendars.
- Tasks—FootPrints
Sync can write Issues to your PIM’s Tasks list.
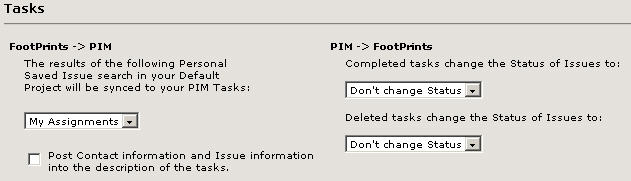
- FootPrints
-> PIM—Tell FootPrints
how to handle Issues when writing them to your PIM’s Tasks list.
- My
Assignments—Writes all Issues that are assigned to you to the PIM’s
Tasks list when FootPrints is
synchronized with the PIM.
- Post
address book and project fields into the description of the tasks—All
of the field data elsewhere in the Issue is written to the Description
portion of the Task if this box is checked.
- PIM
-> FootPrints
- Completed/Deleted Tasks—If you mark a task as completed or deleted in your PIM, when
you synchronize your PIM and FootPrints,
the status of the corresponding Issue in FootPrints
is changed to the status you choose from the drop-down fields:
- Open—Status
is changed to Open in FootPrints.
- Closed—Status
is changed to Closed in FootPrints.
- [Other
Statuses]—Other FootPrints statuses
are displayed in the drop-down. Select
one of those to determine what to do when the status is marked as completed
in the PIM.
- Don’t
change Status—Status is left unchanged in FootPrints.
- Deleted Tasks—If you delete a task from your PIM, when
you synchronize your PIM and FootPrints,
the status to the status you choose from the drop-down fields:
- Open—Status
is changed to Open in FootPrints.
- Closed—Status
is changed to Closed in FootPrints.
- [Other
Statuses]—Other FootPrints statuses
are displayed in the drop-down. Select
one of those to determine what to do when the status is marked as completed
in the PIM.
- Don’t
change Status—Status is left unchanged in FootPrints.
Lotus Notes only supports three levels of priority. When
mapping priorities from FootPrints to Lotus Notes, any priorities numbered
higher than 3 are mapped to 3.
- Contacts—FootPrints can write the contacts in
your FootPrints Address Book to
your PIM’s Address Book. Contact
synchronization requires that you have a personal Address Book search
defined.
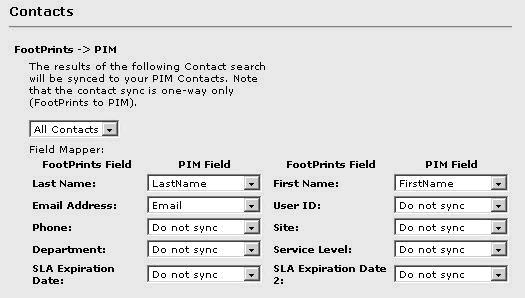
- FootPrints
-> PIM—Tell FootPrints
whether to write the contacts from your FootPrints
Address Book to the Address Book in the PIM and maps the fields in FootPrints to the fields in the PIM.
- Search
drop-down—Select the Address Book search. The
results are what will be written to your PIM.
- Field
Mapper—If you are going to synchronize contacts, you need to configure
the mapping between FootPrints
Address Book fields and PIM Address Book fields.
- FootPrints
Field to PIM Field—Using the drop-down boxes, select the PIM fields
that correspond to the FootPrints
fields.
The FootPrints Sync Client
Once FootPrints Sync is installed, it places two FootPrints
Sync shortcuts on the desktop:
- FootPrints Sync Setup
- FootPrints Sync
Double-click either of the shortcuts to open the client.
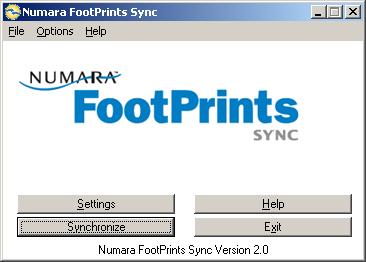
The first step after installation is to define the settings
in the FootPrints Sync client. The
following sections of this document explain the buttons on the FootPrints
Sync interface and then the menu items on the menu bar at the top of the
interface.
FootPrints Sync Settings
To configure settings in the FootPrints Sync client:
- Double-click the
FootPrints Sync Setup shortcut on your desktop.

- Click the Settings
button. A
page is displayed for you to enter your FootPrints User ID, password,
and the URL for the location of the FootPrints link. The
default for this location is http://localhost/MRcgi/webcal/,
where localhost is your PC or
handheld device.
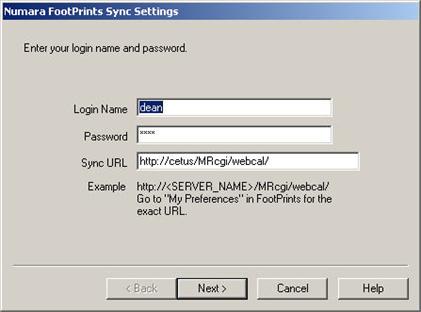
- Click the Next button
after you have entered the information. The
Information Manager Settings window is displayed.
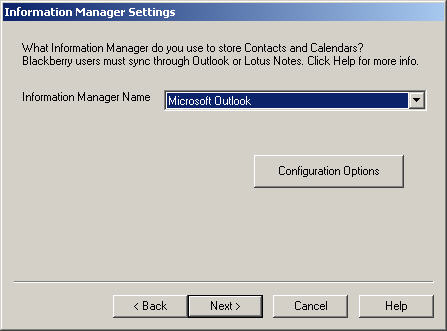
- Select your PIM from
the Information Manager Name drop-down list, then click the Configuration Options
button. Options
are:
- Lotus Notes
- Microsoft Outlook
- Outlook Express
- Palm Desktop
- Palm HotSync
- PocketPC Sync thru
Outlook
- Once you have selected
your PIM, click the Configuration Options button. A
tabbed window is displayed with options for you to configure your PIM.
Not all
tabs are displayed for all types of PIM. Choose
your settings on each tab.
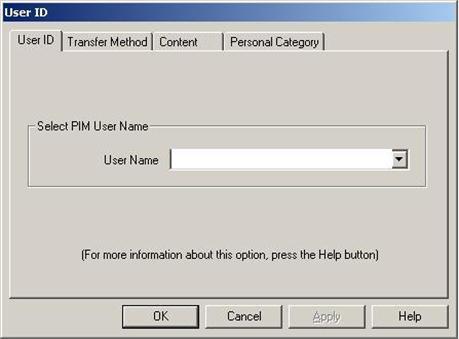
The following are the tabs and their options:
- User
ID—Select the User ID from the drop-down (this tab is displayed
with Palm and Palm HotSync only).
- Transfer
Method—Select whether to transfer data in both directions, from
the PIM to FootPrints only, or
from FootPrints to the PIM only.
- Synchronize
changes both ways—When synchronizing the PIM with FootPrints,
write new data in both directions.
- Add
PIM_type into FootPrints—Only write data from
the PIM to FootPrints.
- Add
FootPrints into PIM_type—Only
write data from FootPrints to
the PIM.
- Content—Select
which data to transfer.
- Contacts—Write
FootPrints contacts into the PIM.
Regardless
of whether you chose to synchronize both ways or in just one direction
on the Transfer Methods tab, you can only write contacts from FootPrints
to the PIM.
- Tasks—Write
FootPrints Issues to the Tasks
list. When
synchronizing from the PIM to FootPrints,
tasks synchronization changes the status field of the FootPrints
Issue according to what you specified when you configured this feature
in FootPrints.
- Calendar—Write
calendar appointments between FootPrints
and the PIM.
- Personal
Category—Choose whether to synchronize Personal Category data (this
tab is displayed with Palm HotSync only).
- Synchronize Personal
Category
- Do not synchronize
Personal Category
- When you have configured
all of your settings on the tabs, click the OK button. The
Information Manager Settings window is re-displayed.
- Click the Next button.
The Synchronization
Settings window is displayed.
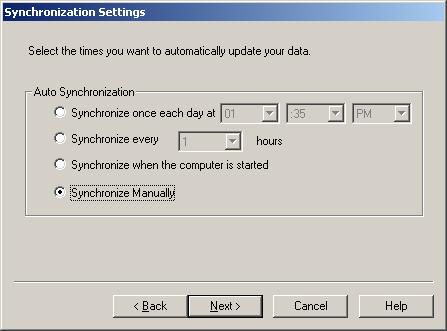
- Select how you want
your PIM synchronized with FootPrints:
- Synchronize
once each day at time—Use the drop-downs to select the time of
day at which the FootPrints Sync client will perform synchronization.
You can
still synchronize “on-demand” by clicking the Synchronize button from
the FootPrints Sync client interface.
- Synchronize
every hours—Use
the drop-down to schedule synchronization every X hours. You
can still synchronize “on-demand” by clicking the Synchronize button from
the FootPrints Sync client interface or by double-clicking the FootPrints
Sync icon. Because
synchronization can be demanding on the server, auto-synchronization can
be scheduled with a maximum frequency of once per hour per user. If
immediate synchronization is required, double-click the FootPrints Sync
icon in your system tray.
- Synchronize
when the computer is started—If you select this option, the FootPrints
Sync client will synchronize when the PC or handheld on which the client
resides is booted. You
can still synchronize “on-demand” by clicking the Synchronize button from
the FootPrints Sync client interface.
- Synchronize
Manually—Synchronization only occurs when you select the Synchronize
button from the FootPrints Sync client interface.
- When you have made
your choices, click the Next button. The
final window is displayed.

- Click the Finish
button to complete the configuration tasks.
Synchronize
Click the Synchronize button to immediately synchronize
settings between the FootPrints Sync client and FootPrints.
Help and Exit
An on-line help document that is specific to FootPrints
Sync is displayed when you click the Help button and select FootPrints
Sync Help. There
is also an About FootPrints Sync option on the Help menu that contains
release information.
Click the Exit button to end your FootPrints Sync session.
FootPrints Sync Menu: File
The File option on the FootPrints Sync client menu displays
a drop-down menu with the following options:
- Uninstall
FootPrints Sync Client—Uninstalls the FootPrints Sync client.
- Reset
Palm Hotsync Settings—Resets the Palm HotSync configuration so
that it no longer is configured for working with the FootPrints Sync client.
- Exit—Exits
the application.
FootPrints Sync Menu: Options
The Options selection of the FootPrints Sync client menu
reveals the following options:
- Reread
PC Data on Next Sync and Reread
FootPrints Data on Next Sync — FootPrints Sync uses a special technology
to skip past records that already exist on the handheld. The
first time a new database is processed it's much slower because FootPrints
Sync must check every field. Subsequent
processes are much faster, because FootPrints Sync only updates the data
that has changed.
Sometimes data changes in a way that FootPrints Sync
does not recognize.
In other
cases, reconfiguration requires a reread, like when you change the Category
field or mobile phone number field in FootPrints Sync.
If you think the record count on the handheld is no longer
reflecting the data record count in your Web PIM, or that the field values
on the handheld do not reflect current FootPrints Sync configuration,
check the appropriate Reread on the next Sync to force FootPrints Sync to reread
the databases and update all fields.
Help
Click the Help button from the menu to get the About
page or to access the FootPrints Sync-specific documentation.
Recurring Appointments
FootPrints Sync handles recurring appointments properly
for all PIMs with one, limited exception. In
the case of Lotus Notes, if a change is made in Lotus Notes to the time
at which a recurring appointment occurs, the change shows up in FootPrints
when it is synchronized. However,
if a change is made in FootPrints to the time at which a recurring appointment
occurs, the change is not reflected in Lotus Notes.
With Lotus Notes, only the most recent description is
synchronized to the To-Do list, not all Descriptions.
Deleting Appointments
One limitation of Numara
FootPrints Sync is that, if you have a calendar appointment with several
people invited and someone syncs with the appointment, then deletes the
appointment from his or her PIM, and then resyncs, the appointment is
deleted in FootPrints even though it may still be relevant to the other
invitees. To
prevent this from happening, if someone does not want to be part of a
group appointment, they should delete themselves as an invitee in the
FootPrints calendar appointment and then resync; the appointment will
be deleted from their PIM and the FootPrints appointment will remain.
Synchronizing “On-demand”
To synchronize the PIM and FootPrints
“on-demand”, i.e., immediately, either double-click the FootPrints Sync
Setup icon and then click the Synchronize button or double-click the FootPrints
Sync icon.
Limitations
FootPrints Sync and Lotus Notes
After updating the Description field in an Issue in FootPrints, the synched "To-do" item in Lotus Notes only shows the most recent description. The older descriptions are gone. This limitation exists by design.
FootPrints Sync and Web Authentication
A situation exists with Web Server Authentication that can cause difficulties with Numara FootPrints Sync. If the users of the Sync program exist in a number of environments, some users may log onto their workstations and into DOMAIN as DOMAIN\USER and some users may only log into the local workstation as DOMAIN\USER. If the target server where FootPrints Sync communicates exists in a different domain (XXX.DOMAIN) from that of the users, whenever they use a plain web browser to connect to FootPrints Sync in XXX.DOMAIN, either from a workstation-in-domain or a stand-alone workstation environment, when the web server challenges them with a domain login and password request, they provide the DOMAIN\USER credentials and are allowed into the web server's resources and, subsequently, into FootPrints. However, because FootPrints Sync runs as the local workstation user and there is no way to "answer" the web server's login challenge through FootPrints Sync, the user will continually be denied access to the Sync service. This is due to the configuration of the customer's domain and must be addressed through proper configuration of interconnectivity between domains.