Edit Customers
The Edit
Customers page includes options to edit a user’s permission level
and to remove a user from the current Project. Normally,
Customer accounts that were created using the System Administrator's Auto-Add
method inherit certain properties and can be manipulated as a group. Keep
in mind that modifying any such Customer through this page sets the user
apart from this group irreversibly; changes to the Auto-Add feature by
the System Administrator do not affect this Customer.
- Select Administration
| Project | Customers | Add Customers from the FootPrints
Toolbar.
- If you know the user
ID, enter it in the field provided.
- To browse from a
list of users, click Select
Customer. A
pop-up window is displayed. If
there are a large number of Customers in the system, the pop-up window
may take a long time to display.
There are two options in the pop-up:
- Unique
Customers—Customers
from other Projects with unique IDs.
- Shared
Customers—Shared,
generic customer IDs.
- Click the user ID
in the pop-up. It
is added to the User
ID dialog box.
- Select from the following
options:
- Remove
this account from this project—This
permanently removes the customer from the current Project.
- Change
this account's role in this project to—This
allows you to change the customer's role to a different customer role,
e.g., change from Customer
Read KB to a customized customer role that you have developed,
or even to an agent or administrator role.
- Change
default project to—This
changes the Project that the customer sees when first logging in.
- Change
customer's authentication method to—If
multiple authentication methods have been defined, you can change the
method required of this customer for logging into FootPrints.
- Change
customer's password to—If
FootPrints internal authentication
is being used for your customers, then the customer password can be changed
through FootPrints. If
you are using external authentication methods, such as LDAP or Windows,
you cannot change the customer's password here.
- Change user preferences—As Project Administrator, you can change the preferences of a particular customer as follows:
- User's Local Time Zone—Select a time zone from the drop-down field.
- Date Format—Select a date format from the drop-down field. Options are "American-MM-DD-YYYY", "European-DD-MM-YYYY", "ISO-YYYY-MM-DD", and "revert to system default"
- Preferred Language—Select a language from the drop-down field.
- Enter your password
and click
 GO.
GO.
Auto-added customers are not displayed in the Select Customer pop-up window from the Add Customer or Edit Customer pages because of the processing overhead involved in sites that have thousands of auto-added customers.
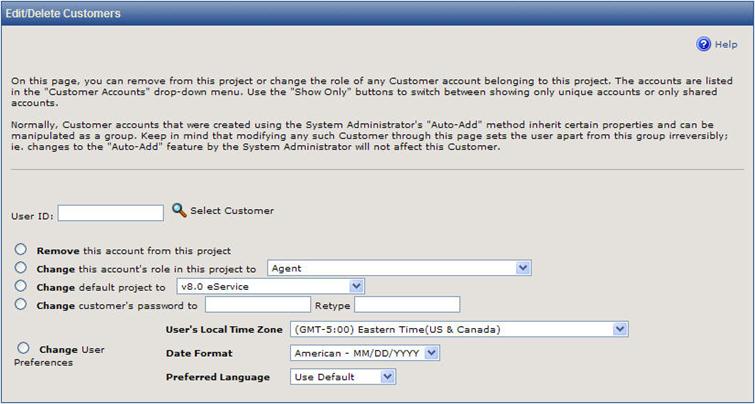
Edit/Delete Customers page
Notes on Editing and Removing Customers
- If a Customer is
removed from the only Project to which he or she belongs, the customer
is also removed from the system.
- When a Customer user
account is removed, the user's contact information remains in the Address
Book. The contact record must be removed from the Address Book separately.
- To change a Customer's
password, go to the User Management page
under System
Administration.
- Adding or removing
a unique Customer account that had been created through the Auto Add Customer
feature removes that user from the group of Customers who were Auto-Added,
including any defaults set for the Auto-Added Customers. Refer to
the chapter on System Administration for
more information on this option.