Dynamic Drop-down Dependency Groups
The Dynamic Drop-down Dependency Group option allows
you to designate a set of drop-down choice fields that display a number
of categories and sub-categories of which the choices are restricted in
each field based on what was selected in the previous field. It
can be used for simple two-field dependencies (for example, a software
application with dependent version numbers) or complex, multi-level groups
of dependent fields that guide the user to drill-down, selecting more
and more granular data to define the problem.
For example, if a user selects Hardware
for Problem
Type, the next drop-down displays a list of hardware types (PC,
NIC,
Mouse,
Keyboard,
etc.) If
the user picks NIC,
the next drop-down lists known network card problems, etc. There
is no limit to the number of fields that can be a part of a dependency
group.
Before setting up the Dynamic Drop-down
Dependency Groups:
- You must first create
the drop-down fields that will be part of the dependency group with all
of the possible choices for each field. You
create new fields on the Administration
| Project | Field
Maintenance page. As
an example:
The examples here outline setting up a group of three dependent
fields for Problem
Type, Issue
Type, and Root
Cause for a standard IT help desk. Dependency groups can be created
for any type of process, with any number of fields and choices.
- You could make
three drop-down fields called Problem
Type, Issue
Type, and Root
Cause.
- For Problem
Type, the choices could be Hardware,
Software,
Network,
and Printer.
- The Issue
Type field would contain all of the possible sub-categories for
each of those choices: Hardware
types like CD-ROM,
Mouse,
Phone,
etc., Software
types like Acrobat,
Word,
etc., Network
Issue types like Reset
Password, Can't
connect to network, etc.
- The Root
Cause field would contain any further categorization needed for
each of the Issue types. For
CD-ROM,
the choice might be Can't
open tray, Can't
access drive, etc.
- The fields for the
dependency group must all be of type public or internal. We recommend
all fields are all either mandatory or optional. If the fields are mixed
mandatory and optional, the earlier fields in the group should be mandatory,
while the later one are optional.
- The fields should
be arranged in the order of the desired dependency.
- You may want to map
all of the possible choices and paths out on paper before you create the
fields.
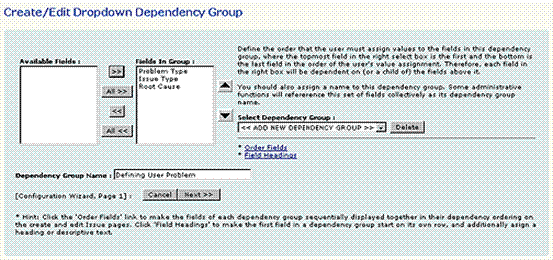
To create a Dynamic
Drop-down Dependency Group:
- After creating the
fields you need to complete this procedure, select Administration
| Project | Dependencies.
- Select Dynamic
Drop-down Dependency Groups. The
Create/Edit
Drop-down Dependency Group page is displayed. This
page contains two dialog boxes: Available
Fields and Fields
in Group. The Available
Fields are any drop-down fields in the project that aren't already
part of a dependency group. The Fields
in Group are the fields that are to be part of the dependency.
- Select the first
field you want in the dependency group and click the
 arrow
button.
arrow
button.
- Continue to select
the other fields for the dependency group. There is no maximum number
of fields in a group, but the minimum requirement is two. It
is recommended that you order the fields in the project in the same order
as selected above by selecting Order
Fields before you continue.
This places the dependent fields in the group in the correct order.
- Enter a name for
the Dependency Group and click
 . The
next page displays a multi-select box for each value in the first field
in the group. For example, if the field is Problem
Type, there is one box each for Hardware,
Software,
Network,
and Printer.
. The
next page displays a multi-select box for each value in the first field
in the group. For example, if the field is Problem
Type, there is one box each for Hardware,
Software,
Network,
and Printer.
Define the fields for the dependency
group
- All of the values
for the second field in the group, Issue
Type, are listed in each multi-select box. For each problem type,
select the values that should appear in the Issue
Type field if the user selects that problem type. For
example, in the Hardware
box, select CD-ROM,
Mouse,
Phone,
etc., in the Software
box, select Acrobat,
Word,
etc. Hold
down the CTRL
key to select multiple values.
Issue
Type values can be selected for more than one Problem
Type. Issue
Type values must be selected for at least one Problem
Type or they will never appear in the Issue form.
- When all items have
been selected, click . The
next screen contains a multi-select box for each Issue
Type. The boxes each contain all of the possible Root
Causes.
Define Issue Types for each Problem
Type
- Select the Root
Causes for each Issue
Type. For Issue
Types that have no defined Root
Cause, do not select anything. The
Root
Cause field will not appear for those Issue Types.
- When you are finished,
click
 SAVE.
SAVE.
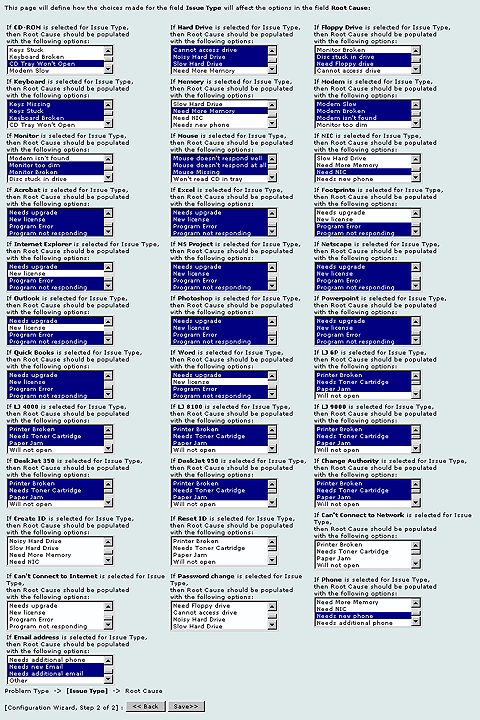
Select Root Causes for each Issue
Type
The View Button
The Create/Edit Drop-down Dependency Groups page contains
a View button. Clicking
the View button displays the Drop-down Dependency View, which provides
a visual illustration of the dependency tree for the dependency groups
that you are editing. Fields
are listed in columns. When
you click on a field name, the field is highlighted. In
addition, the field that precedes and field(s) that succeed the selected
field are also highlighted, thus showing the dependencies..
If, having selected a field, you click the Display
Selected link, a the Drop-down Dependency View page is displayed.
This page
provides a further illustration of the selected field's dependencies in
the tree structure. You
can click a button to print the structure from the pop-up window or click
a button to close the window.