Creating Quick Issue Templates
To create a new Quick Issue template:
- Select Administration
| Project from the FootPrints
Toolbar, then select Quick
Issue under the Automated
Tasks section of the Project
Administration page.
- If this is the first
Quick Issue template, in the top section of the Quick
Issue Administration page, enter a name for the template (this
is displayed in the FootPrints
Toolbar) and click
 GO.
The name
is limited to 20 characters. A
longer Title
can be given in the actual template.
GO.
The name
is limited to 20 characters. A
longer Title
can be given in the actual template.
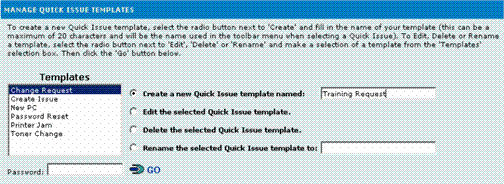
- When creating subsequent
templates, the Manage
Quick Issue Templates dialog is displayed in the top section of
the administration page. To create a new template, select the radio button
for Create a new Quick Issue Template, enter the name, and click GO.
- The Create Quick
Issue template page is displayed. This
page is similar to the regular Create
Issue page, but with fewer fields. Address
Book fields, time tracking, etc. will be filled in by the Agent when an
Issue is created with the template.
- The available fields
are:
- Title—This is the
Title
of the Issue. It can be as long as needed.
- Priority—This is the
default priority for Issues created with the template. It
can be changed by the Agent when creating the Issue, as needed.
- Status—This is the
default status of Issues created with the template. It
can be changed by the Agent when creating the Issue. If
the type of Issue the template relates to is usually resolved during the
initial call, Closed
can be selected as the Status for the template.
- Issue
Information—One
or more Project fields can be set here for the template. Any
fields not filled out here can still be filled out by the Agent when creating
a new Issue from the template. Mandatory
fields do not have to be populated when creating the template (although
they can be), but must be filled out when the Agent creates an Issue.
For example,
you may have a mandatory field for Follow-up
Date that depends on when the Issue is created. Do
not fill this field out when creating the template; instead, it is mandatory
for the Agent to fill out when creating an Issue with template. A
field like Problem
Type, however, would be appropriate to set in the template, as
this remains constant for Issues created with the template. Exception: Date fields (but not Date/Time fields) contain
a checkbox for Current
Date. If
this is checked in the template, it is pre-filled with the current date
when an Agent creates an Issue. This would be useful for a field like
Date
Reported.
- Description—This can contain
a pre-filled description of the problem and/or Solution. The
Knowledge Base can be used in the template to select the Solution if it
already exists there.
- Attachments—One or more
files can be attached to the template. New
Issues created with the template automatically contain links to the attachments.
This is
useful for standard Request types for procedures, patches, or other documents.
- Assignees—Optionally
select one or more Assignees or Teams to be assigned to Issues created
with the template. If
no assignees are selected, the default Auto
Assignment rules apply to Issues created with the template. For
example, if the default rule is to assign an Issue to the Agent creating
it, an Issue created by an Agent using the template is assigned to the
Agent.
- Email
settings follow the rules for the Project.
- When you are done
populating fields, click GO.
- The template is created.
The Quick
Issue Administration page is displayed. From
here, you can edit or delete the template or create new templates.
- The template appears
on the FootPrints Toolbar for
all Agents under the new heading
 Quick
Issue.
Quick
Issue.
Create a Quick Issue Template