Create Test Issue
The names of many of the fields in FootPrints
can be changed by the administrator (Title,
Priority,
Status,
Description,
etc.), as well as the name of the records (Issue).
Custom fields can also be created. These
fields may also be in a different order from the order described here,
and may contain different choices, depending on how the Project is configured.
For clarity,
this manual always refers to FootPrints records as Issues,
and uses the default terms for the other field names.
- Enter
a Title—Used
as the summary or subject line.
Although the Title is intended to be brief, it is important
to enter meaningful words since it is used to identify the Issue. For
example, a good title would be "MS Word crashes when underlining",
but "READ THIS--IMPORTANT!!" would not be as effective.
This field can optionally be a drop-down box with a defined set of subjects.
- Select
a Priority—The
Priority of the Issue is a number or word that indicates the importance
or impact of the Issue. Select the appropriate Priority from the
drop-down list.
- Select
a Status—The
Status is the indication of the current state of the Issue. The
valid statuses depend on how the Project is configured. Statuses
may include "Open", "Pending", "Testing",
"Closed", etc. Choose the appropriate Status from the
drop-down list. Since you are creating a new Issue, set the Status
to "Open."

Enter title, priority
and status
- Fill
in Contact Information—This
section contains the contact information for the Customer associated with
this Issue. The Select Contactfeature searches the Address Book for the user.

Select
a contact from the Address Book
- Enter
Issue Information—The
fields that appear here vary according to Project and are defined by the
FootPrints ProjectAdministrator. For example, you
may have a field called Platform
that is a drop-down box. Select the user’s platform from
the list of choices. You may also have a field called Version
number with a text field next to it. You would type the version
number in this field. Consult your FootPrints ProjectAdministrator for more information on the Project fields in the current
Project.
The fields in your FootPrints
installation may be different from those shown here, as they can be customized.

Fill in Issue Information fields
All fields displayed in red
are mandatory and must be filled out.
- Description—Enter a full
description of the issue in this field. You can type an unlimited
amount of text in this box. This field is designed to contain a
complete description of the Issue and is usually mandatory when creating
a new Issue. If you are using the HTML Description Editor, there
are many options available to format the text in the Description.
Fill in a
full description of your Issue. FootPrints automatically records the date, time and your name as the originator
of the Issue.
Enter a Description
- Search
Knowledge Base (optional)—Search
the Knowledge Base for a Solution to the current issue and then import
that Solution into the Description.
- Attach
a File (optional)—You
can attach one or more files to this Issue from your local or network
drive(s).
- Assignees—The list on
the left contains a list of all FootPrints users in this Project.
To assign someone to this Issue, highlight the user’s name on the left
and click the
 button. The name is displayed in the
box on the right. Multiple users can be assigned. Before
assigning Agents, you can check Agent availability by clicking the
button. The name is displayed in the
box on the right. Multiple users can be assigned. Before
assigning Agents, you can check Agent availability by clicking the  Check Availability
icon to see which Agents can be scheduled to work.
Check Availability
icon to see which Agents can be scheduled to work.
If Teams are enabled, users are listed under
their Team name. Both Teams and users can be assigned:
- To view the members
of a Team, select the Team name. The Team expands with a list of users.
- To assign the Team,
select Assign
Team and click . The Team appears in the assignment
box.
- To assign a particular
user, select the user's name and click . The
user is listed under the Team name in the assignment box.
- Multiple users can
be assigned from the Team.
- To assign another
Team, click the Team name to shrink the list and select another Team.
- To assign a user
without his or her Team, or who doesn't belong to a Team, select the Individual
Users option.
If the Auto Assign feature is enabled, Teams and or users
appear in the Assignee
box automatically based on a choice in one of the drop-down fields.
Ask your Project Administrator whether this feature is enabled.
Assign users
- Email
Notification—FootPrints' Email Notification feature
can send email notification to users when an Issue is created, updated,
and closed.
- Time
Spent—This
section allows you to enter the amount of time you have spent on this
Issue. This can include the entire time spent on this Issue, not
necessarily just the time spent filling out the Issue in FootPrints.
Fill in the hours and minutes spent. Additional fields may be displayed
in this section depending on the Project configuration, including Start
Time/Date and End
Date/Time and Billing
Rate. If the field is mandatory and you must enter a Start
and End Date/Time, you cannot enter the same Date/Time for both the Start
and End (i.e., you cannot enter zero time). If
the field is optional, you can enter the same Start and End Date/Times
(i.e., you can enter zero time). Consult
the Project Administrator for more information.

Enter the time spent
- Automated
Time Tracking—If
this feature is enabled, the auto time clock is displayed in the upper-right corner of the Issue above the Title field. You can pause
 the clock temporarily to stop the clock. Click the pause button again to restart the clock.
When you submit the Issue, elapsed time is recorded.
the clock temporarily to stop the clock. Click the pause button again to restart the clock.
When you submit the Issue, elapsed time is recorded.
- Comment—If the Project
administrator has enabled time tracking comments, you can enter a comment
here. The field is limited to 255 characters.
Comments
in the time tracking field can be viewed in the Time Spent section of an Issue and can be displayed in a report.
- Submit
Issue—When
you are ready to submit the Issue, click
 SAVE.
If FootPrints detects that you have left a mandatory field blank
or entered something incorrectly (e.g., entered text in a number field),
a message is displayed instructing you to go back and fix the Issue.
SAVE.
If FootPrints detects that you have left a mandatory field blank
or entered something incorrectly (e.g., entered text in a number field),
a message is displayed instructing you to go back and fix the Issue.
Once you have successfully submitted the Issue, FootPrints
assigns it an Issue number and displays your FootPrints
Homepage. From there, you can select the new Issue to view the Details,
click  Edit to edit
the Issue, or perform any other FootPrints task.
Edit to edit
the Issue, or perform any other FootPrints task.
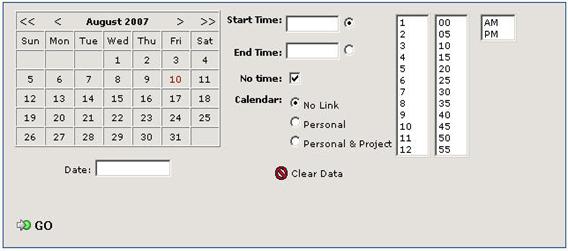
Setting Appointments from a Date/Time Field
Users can set an appointment from a date/time field when
creating or editing an Issue. To
do so:
- Select the date from
the calendar.
- Select the time for
the appointment.
- Click in the date/time
field or the
 icon beside the field.
- Enter a start time
for the appointment by clicking the Start Time radio button, then clicking
on the time fields beside it (e.g., if the meeting begins at 2:30 in the
afternoon, click on the 2, then the 30, and then the PM).
- Enter a time for
the appointment to end by clicking the End Time radio button and then
clicking on the time fields beside it.
- Select whether to
link the appointment to the personal calendar, personal and project calendars,
or neither by selecting a radio button.
- Click the
 GO button.