Create Phases
To create a phase:
- Select Administration
| Project, then select Change
Management from the Automated
Workflow section of the main frame.
- Click Add
Phase. The
Configure
Approval Phase page is displayed.
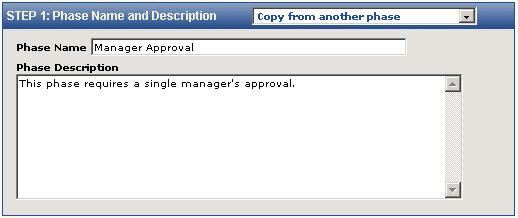
- In Step
1, give the Phase a name and, optionally, a description.
- The Copy From Another Phase field allows you to copy all of the phase information from an existing phase. If you want to copy phase data, click the arrow to display all of the phases and the processes with which they are associated and then select the phase you want to copy from the drop-down. You can edit the choices for the copied phase according to the following instructions.
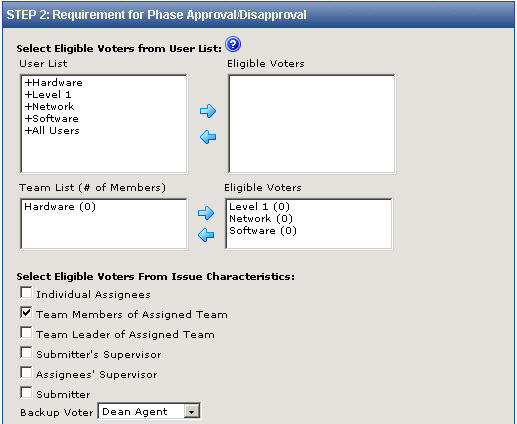
- In Step
2, select the approvers. There are several options for selecting approvers and you can select any combination of these options.
- User List—Highlight an individual user or users in the User List on the left and then use the arrow button to move them to the Eligible Voters list on the right (or highlight Eligible Voters and use the arrow button to remove them from the list).
- Team List—Highlight a team or teams in the Team List on the left and then use the arrow button to move them to the Eligible Voters list on the right (or highlight Eligible Voters and use the arrow button to remove the team from the list).
- Select Eligible Voters From Issue Characteristics—Check the boxes to select eligible voters based on the Issue characteristics. Options are:
- Individual Assignees—Designates the Issue assignees as approvers for this Issue and phase only.
- Team Members of Assigned Team (if Team assigned)—Designates the members of an assigned Team as approvers for this Issue and phase only.
- Team Leader (if Team assigned)—Designates the Team Leader of an assigned as an approver for this Issue and phase only.
- Submitter's Supervisor —Designates the Issue submitter's supervisor as an assigned approver for this Issue and phase only.
- Assignees' Supervisor— Designates the Issue assignee's supervisor as an assigned approver for this Issue and phase only.
- Submitter— Designates the Issue submitter as an assigned approver for this Issue and phase only.
- Select an approver who will only vote if...—Select a fallback voter in case none of the selected eligible voters (e.g., Assignees’ Supervisor) can vote on the Issue. A selection is only required when
nobody is set to be an eligible voter and one of the selection boxes is selected in the 'Select Eligible Voters from User List'.
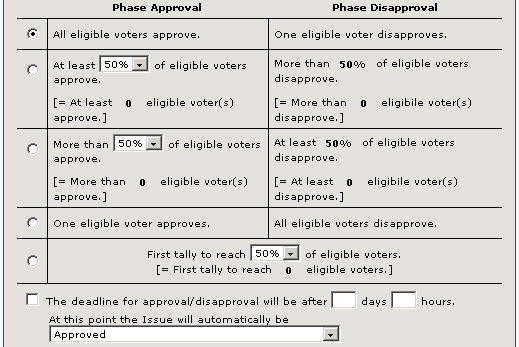
- Select
the way approval votes are handled using the checkboxes.
- Phase
approval when All eligible voters
approve. Phase
Disapproval when One eligible
voter disapproves—All voters must unanimously approve the Issue
in order for the Issue to be considered approved. This
means that if there is just one vote against approval, the Issue is rejected.
It also
means that as soon as one disapproval is submitted, voting is closed regardless
of whether all approvers have voted.
- Phase
approval when At least X%
of eligible voters approve. Phase Disapproval when
More than X% of eligible voters disapprove—Approval
is given when X% voters approve. For
example, if this is set to 33% and there are nine eligible approvers,
when three of them approve then the Issue is approved. When
the approval percentage is selected, the disapproval percentage is calculated
for you automatically. Approval
or disapproval do not always wait for all of the votes to be submitted;
as soon as the approval or disapproval threshold is reached, the
voting is closed.
- Phase
approval when More than X%
of eligible voters approve. Phase
Disapproval when At least X%
of eligible voters disapprove— Approval is given when more than
X% voters approve. For
example, if this is set to 33% and there are nine eligible approvers,
when four of them approve then the Issue is approved. When
the approval percentage is selected, the disapproval percentage is calculated
for you automatically. Approval
or disapproval do not always wait for all of the votes to be submitted;
as soon as the approval or disapproval threshold is reached, the
voting is closed.
- Phase
approval when One eligible voter
approves. Phase
Disapproval when All eligible
voters disapprove—The Issue is approved when one of the eligible
voters approves. The
Issue is only disapproved if disapproval is unanimous. Voting
closes as soon as one of these states is reached.
- First
tally to reach X% of eligible voters—The Issue is approved
or disapproved based on which set of voters achieves the specified percentage
of voters first. For
example, if 33% is specified and there are nine approvers, then the first
vote count to reach three votes first decides the Issue.
- Deadline
for approval/disapproval checkbox—Check the box and enter the amount
of time to set a deadline to approve/disapprove. If
a clear approval or disapproval vote is not reached when the timer runs
out, the decision is made according to what is specified in the drop-down
field. The
number of days refers to real days, not Project Schedule days. Drop-down
options are: Approve
(the Issue is approved when the timer runs out); Disapprove (the Issue
is rejected when the timer runs out); Highest Tally-Tie: Approve (whichever
set of votes is higher wins, but in the case of a tie the Issue is approved
when the timer runs out); Highest Tally-Tie: Disapprove (whichever set
of votes is higher wins, but in the case of a tie the Issue is disapproved
when the timer runs out).
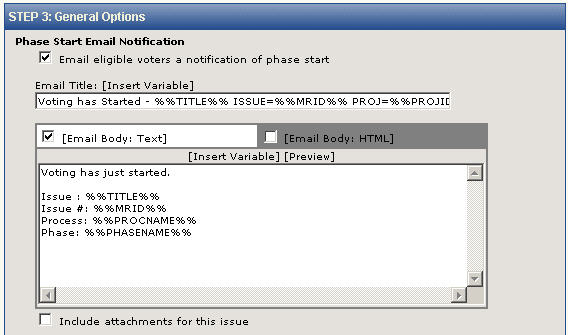
- Step
3: General Options deals mainly with email notifications for approvers,
but provides some other options as well.
- Phase
Start Email Notification—Notify approvers that a phase requiring
their approval has begun.
- Email
Title—Enter the title you want to include at the top of each email
notification. With
respect to %%Variable%% expressions, some field data from the Issue can
also be used in the field headers, as follows:
- Issue
Number—%%MRID%%
- Title—%%TITLE%%
- Priority—%%PRIORITY%%
- Status—%%STATUS%%
- Submitter—%%SUBMITTER%%
- Project
ID—%%PROJID%%
- Project
and Address Book fields—%%FIELD NAME%% where "FIELD NAME"
is the name of the field in upper case.
- Voting
by email—Include the %%BALLOT%% variable to include a ballot with
the notification. It
is a better idea, however, to include the ballot in the body of the email
than in the header. The
ballot can be completed and returned by the approver to cast the vote.
Click the [Insert Variable] link to display
a list of valid variables. Double-click
a variable or click it once and then click the Insert button to append
the variable to the title. Click
the [Preview] link to view a preview of the email you have built.
- Email
Body— Check the box for Text or HTML to determine the format to
be used for outgoing Change Management email. If
you select HTML, you can use standard HTML tags to format the email, but
the variables remain the same as always. Once
you select the type of email body to use, click on either [Email Body:
Text] or
[Email Body: HTML]
to access the message body and edit it. Enter
the content you want included in the body of the email. With
respect to %%Variable%% expressions, field data from the Issue can also
be used in the email body, as follows:
- Issue
Number—%%MRID%%
- Title—%%TITLE%%
- Priority—%%PRIORITY%%
- Status—%%STATUS%%
- Submitter—%%SUBMITTER%%
- Project
ID—%%PROJID%%
- Project
and Address Book fields—%%FIELD NAME%% where "FIELD NAME"
is the name of the field in upper case.
- Description—Include all description data from the Description field by using the %%DESCRIPTION%% variable. Include only the first description entered by using the %%DESCRIPTIONFIRST%% variable. Include only the most recent description by using the %%DESCRIPTIONLAST%% variable.
- Voting
by email—Include the %%BALLOT%% variable to include a ballot with
the notification. It
is a better idea, however, to include the ballot in the body of the email
than in the header. The
ballot can be completed and returned by the approver to cast the vote.
Click the [Insert Variable] link to display
a list of valid variables. Double-click
a variable or click it once and then click the Insert button to append
the variable to the title.
- Include
attachments for this issue—Click the checkbox to include any attachments
to the Issue with the email.
- Vote
Notification—You can optionally notify all eligible voters when
another voter records a vote on the Issue. Use
the checkbox to determine whether to notify voters of approval, disapproval,
and/or deferred votes, as well as whether or not to send a notification
to the vote submitter. The
vote submitter will not receive a notification if none of the other checkboxes
in this section are selected.
Email Title, Email Body, and Attachment
options are the same as above under Phase Start Email Notification.
- Recurring
Email Reminder—Enable email reminders, select the frequency with
which email reminders are sent to approvers to remind them to vote on
an Issue, and specify the content of the email. The
emails are sent until the approver's vote has been recorded or the Issue
has been approved or rejected.
Email Title, Email Body, and Attachment
options are the same as above under Phase Start Email Notification.
- Minutes/Hours/Days/Weeks—Select
the frequency with which email reminders are sent to approvers who have
not yet voted. Selections
are exclusive, meaning that you can only pick the frequency from one of
the time periods. If
you select a frequency from a different time period, the previous time
period is zeroed out. In
other words, if you picked "15 minutes" and then picked "3
hours", the minutes selection returns to 0.

- Anonymous
Voting—By
default, details of the voting results can be displayed, including who
voted and how they voted. Check
this box to hide eligible voters and current vote lists from the extended
voting details page. Votes are not completely anonymous to everyone because
anyone with the role to run change management reports or view change management
history can still view votes in those places.

- Step
4: Actions
on Phase Approval determines what is done with an Issue once an
approval has been obtained.
- Status-Click
the checkbox and then select a status from the drop-down list if you want
the status to change once this phase of voting has concluded.
- Priority—Click
the checkbox and then decide how you want the priority changed when phase
approval is obtained as follows:
- Move
the Priority X step(s) toward 10—Provides
a relative number for raising the priority number.
- Move
the Priority X step(s) toward 1—Provides
a relative number for lowering the priority number.
- Change
the priority to X—Specify
a priority number to which the priority is changed when phase approval
is obtained.
- Assignment
- Change
assignment of Issue—Assign
the Issue to another agent or agents when the approval is finalized.
- Add
selected users as Assignees if they are not already assigned—Does
not change the current assignees, but allows you to add additional assignees.
Use the
assignee box to select the new assignees.
- Re-assign
to selected users after unassigning all existing users—Unassigns
all current assignees. You
then have to assign a new set of assignees. Use
the assignee box to select the new assignees.

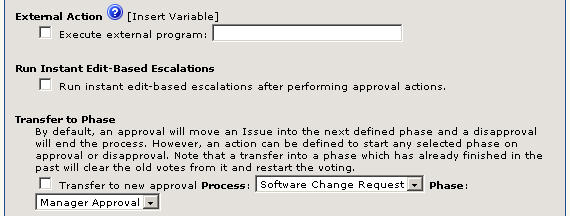
- External
Action—Click
the checkbox to enable this function, which allows you to execute an external
program when approval is obtained for this phase. This
feature is especially useful for running scripts. The
external program must be one that can run and stop on its own without
any user intervention. In
addition, if the program involves running a graphical user interface (GUI),
it may not be able to display the interface to a screen, which could cause
the program to hang and fail. Therefore,
the program should also be one that can run from a command line rather
than a GUI. Enter
the path to the program in the Execute
external program field. In
addition, you can pass field data to the external program by using the
%%Variable%% functions. Click
the [Insert
Variable] link to display a list of valid variables. Double-click
a variable or click it once and then click the Insert
button to append the variable to the field.
- Run
instant edit-based escalation—If
you check the box, if the end of a phase triggers an edit to an Issue,
the Issue is checked against escalation criteria and, if it matches escalation
criteria, the Issue is escalated accordingly. If
the box is not checked, which is the default, then a Change Management
approval or disapproval does not trigger an escalation.
- Transfer
to Phase—By
default, an approval moves an Issue into the next defined phase and a
disapproval ends the process. However, an action can be defined to start
any selected phase on approval or disapproval. Note that a transfer into
a phase which has already finished in the past clears the old votes from
it and restarts the voting. Click
the checkbox and then select a phase from the drop-down to transfer the
phase upon a phase approval.
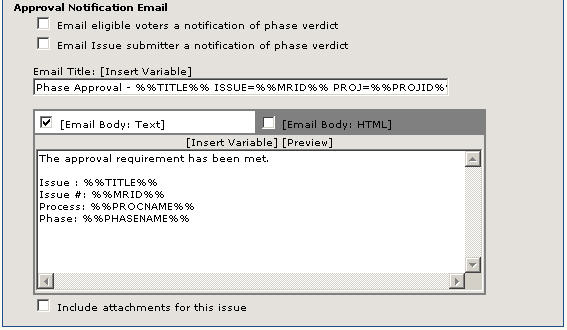
- Approval
Notification Email
- Email
eligible voters a notification of phase verdict—Check
the box to have an email notification sent to all approvers when the phase
approval is made.
- Email
Issue submitter a notification of phase verdict—Check
the box to have an email notification sent to Issue submitter when the
phase approval is made.
- Email
Title—Enter the title you want to include at the top of each email
notification. With
respect to %%Variable%% expressions, some field data from the Issue can
also be used in the field headers, as follows:
- Issue
Number—%%MRID%%
- Title—%%TITLE%%
- Priority—%%PRIORITY%%
- Status—%%STATUS%%
- Submitter—%%SUBMITTER%%
- Project
ID—%%PROJID%%
- Project
and Address Book fields—%%FIELD NAME%% where "FIELD NAME"
is the name of the field in upper case.
Click the [Insert Variable] link to display
a list of valid variables. Double-click
a variable or click it once and then click the Insert button to append
the variable to the title. Click
the [Preview] link to view a preview of the email you have built.
- Email
Body— Check the box for Text or HTML to determine the format to
be used for outgoing Change Management email. If
you select HTML, you can use standard HTML tags to format the email, but
the variables remain the same as always. Once
you select the type of email body to use, click on either [Email Body:
Text] or
[Email Body: HTML]
to access the message body and edit it. Enter
the content you want included in the body of the email. With
respect to %%Variable%% expressions, field data from the Issue can also
be used in the email body, as follows:
- Issue
Number—%%MRID%%
- Title—%%TITLE%%
- Priority—%%PRIORITY%%
- Status—%%STATUS%%
- Submitter—%%SUBMITTER%%
- Project
ID—%%PROJID%%
- Project
and Address Book fields—%%FIELD NAME%% where "FIELD NAME"
is the name of the field in upper case.
Click the [Insert Variable] link to display
a list of valid variables. Double-click
a variable or click it once and then click the Insert button to append
the variable to the title.
- Include
attachments for this issue—Click the checkbox to include any attachments
to the Issue with the email.
- Step
5: Actions
on Final Disapproval determines what is done with an Issue once
a disapproval has been obtained. The
options are the same as in the preceding step of this procedure.
- Type in your password
and then click the
 GO
button to save this phase.
GO
button to save this phase.
If the final phase in a process does not specify at least
one action to be taken upon final approval and the Issue is approved,
the Issue will be re-submitted to the same Change Management process.
Likewise,
if the final phase in a process does not specify at least one action to
be taken upon final disapproval and the Issue is disapproved, the Issue
will be re-submitted to the same Change Management process. In
other words, the Issue will loop back into the process in those instances.
To ensure
that this does not happen, the final phase in a process should specify
some action to be taken upon final approval and upon final disapproval.