Create Approval Processes
To create an approval process:
- Select Administration
| Project, then select Change
Management from the Automated
Workflow section of the main frame. The
Change Management page is displayed.
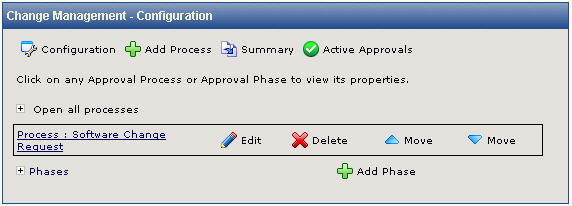
- Click
 Add Approval Process.
The Configure
Approval Process page is displayed.
Add Approval Process.
The Configure
Approval Process page is displayed.
- In Step 1, enter
a name for the process (e.g., Capital Expenditure) and any comments or
description you want to include for the process.

- Enter the criteria
for initiating the approval process. When
an Issue is created, the data in the Issue is compared to the criteria
specified here. If
the criteria match the data, the Issue is put into the approval process.
- Title—Enter a word
or phrase for which to search.
- Description—If a word or
phrase is entered (or multiple words using Boolean Operators), only Issues
containing that word/phrase in the Description are returned.
- Keyword—If a word or
phrase is entered, any Issues containing that word/phrase in any field
are returned, including Title,
Description,
Project fields, and Address Book fields, as long as the full text search
conforms to
behavior.
- Fields
Included: The Keyword search queries theTitle
field, Description
field, Project (Issue), and Address Book fields for all FootPrints
database versions (SQL Server, Access, SQL Express, Oracle, and MySQL) except
for the FootPrints database. The
FootPrints database version only
searches the Title
and Description.
- File
Attachments—Search
for file attachments by name (not by content). This criterion works in
all FootPrints versions except
the FootPrints database version.
- Assigned
to—Highlight
one or more users to returns Issues assigned to the user(s) selected,
holding down the CTRL
key to select multiple users. If you do not want to limit the search
to any particular assignees, do not highlight any users.
are also available for this field.
Access to Issues is based on a user's .
Assignment
options may be restricted based on your role. Please consult your FootPrints administrator for more information.
- Submitted
by—If
a user is selected, the search returns only Issues created by that user.
- Priority—Returns only
Issues of the specified priority or priorities. Highlight the priorities
to be included; hold down the CTRL key to highlight multiple priorities.
To return all priorities, no priorities need to be selected (this has
the same result as selecting all priorities).
- Status—Returns only
Issues of the specified status(es). By default, Open
and any custom statuses are highlighted in the status dialog. To
select multiple statuses, hold down the CTRL key.
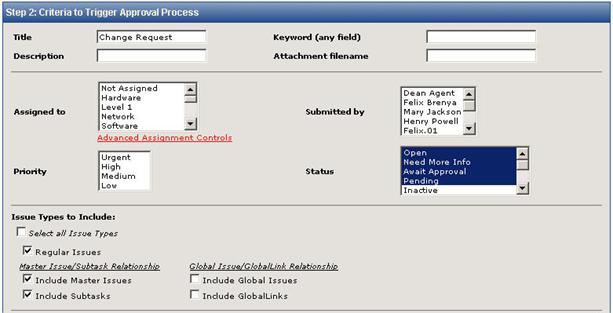
- Issue
Types to Include—Specify
whether Advanced Issue types, including Subtasks and Global Issues, are
returned. Options include:
- All
Issue Types—All
Issue types are returned.
- Regular
Issues—Regular
(non-Global or Master/Subtask) Issues are returned.
- Include
Master Issues—
that contain subtasks are returned.
- Include
Subtasks—Subtasks
of Master Issues are returned.
- Include
Global Issues—
are returned.
- Include
GlobalLinks—All
users' Issues linked to a Global Issue are returned.
- Group
Master Issues with Subtasks/Global Issues with Global Links—Available for
Reports only. These options override the sort order selected in the report.

- Date—If dates are
specified, the search returns only Issues from the time period specified. \
- Age—Returns Issues
created in the time specified. Number
of days and hours can be specified. Modifiers
are also provided, including “Greater Than”, “Less Than”, “Equal to”,
“Greater than or Equal to”, “Less than or Equal to”, and “Not Equal to”.
As an example,
to return Issues greater than 1 day old, choose “Greater than” and fill
in “1” for “Days”.
Age is always 24/7 and does not use the Project Work Calendar.

- Issue
Information—The
fields in this section differ depending on the fields in the current Project.
Search
on as many fields as desired. Search methods vary with the field data
types:
- Character
field—Displays
a text box. Enter the word or phrase to search on (or multiple words using
).
- Number
field—Displays
a text box. Enter the number or part of a number for which to search.
- Drop-down
and Multi-select field—Displays
a multi-select dialog box. Highlight one or more values to search on.
To search
for Issues that contain no data for the field, select No
data. If
you do not want to restrict the search based on choices in a field, do
not highlight any values.
- Date
fields—Search
on a date or date range.
Date/time fields can only be searched by date, not time.
- Other
field types—Email,
URL, and FTP fields display a text box. Enter the word or phrase to search
on (including partial addresses).

- Address
Book Fields—Search
by users' contact information. The fields in this section differ depending
on the fields in current Address Book. Search
methods are the same as those for Issue Information fields (see above).
- Linked Configuration Items (CIs)—Select a Saved Search for finding Configuration Items to link to Change Management Issues that meet the criteria of this process or click the button to create a fresh search for finding CIs to link to the Issue. For detailed information on Configuration Management, refer to the Numara Configuration Management topic. For details on Configuration Management searches, refer to the CMDB Search topic.

- Advanced
options
- And/Or—Select whether
the criteria you entered are all required to be fulfilled before triggering
the change management approval process (And)
or only one of them must be fulfilled before triggering the approval process
(Or).

- Enter your password
in Step
3: Save the Approval Process and click the
 GO button to save this process.
The next section of this document describes how you create
the individual phases in the process you created.
 .
Assignment
options may be restricted based on your role. Please consult your FootPrints administrator for more information.
.
Assignment
options may be restricted based on your role. Please consult your FootPrints administrator for more information.