CI Types, Layouts, and Attributes
Use the CI Types page to create/edit/delete CI Types, define how those CI Types are displayed in visualizations, determine the layout of the CI Types with respect to their tabs, and add HTML headers.
Create CI Type
To create a CI Type, from the CMDB homepage:
- Select Administration | CI Types. The Configure CI Types page is displayed.
- Click the
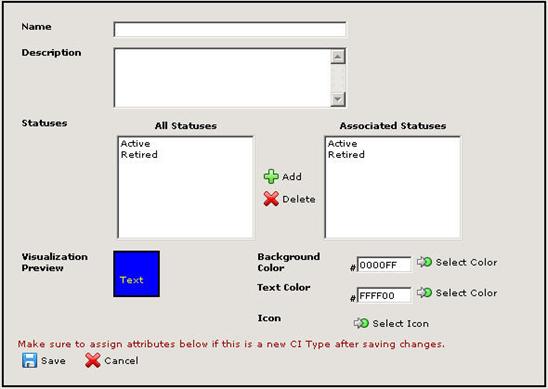
 Create button. The CI Type Editor is displayed containing fields and buttons for creating a CI Type. The fields and actions you can take in this area are as follows:
- Name—Enter a name for the CI Type in the Name field. For example, you might enter "Server". Later, when you create the CIs themselves, you will categorize them according to CI Type. At that point, you might further refine a Server type and identify it as an "Email Server". It is mandatory that you enter a name in this field.
- Description—Enter information about the CI Type in the Description field. The field is provided for maintaining useful information about the CI Type. Entering a description is optional.
- All Statuses and Associated Statuses—The All Statuses and Associated Statuses fields allow you to associate statuses with the CI Type. Only the statuses you select can be set for the CI Type. You might have many different statuses, but associate only a few of them with a particular CI Type. To associate a status with a CI Type, highlight the status in the All Statuses field and then click the Add button. To remove an association between a status and a CI Type, highlight the status in the Associated Statuses field and click the Delete button. The status is not deleted, but removed from the Associated Statuses field. Changing the statuses is optional.
- Background Color—Select a background color for visualizations representing the CI Type. The Graphics Visualization field shows the current (default) color. To select a background color, enter the hex value of the color you wish to use or use the color picker. Changing the color is optional. To use the color picker:
- Click the
 Select Color button.
 - Choose from the sample colors and then manipulate the RGB values by dragging the sliders along the color line. The color displayed in the Selected Color area changes as you move the sliders. When you have the color you want to use for the background, click the GO button.
- Text Color—Select a text color for visualizations representing the CI Type. The Graphics Visualization field shows the current (default) color. To select a text color, enter the hex value of the color you wish to use or use the color picker. Changing the color is optional. To use the color picker:
- Click the Select Color button.
- Choose from the sample colors and then manipulate the RGB values by dragging the sliders along the color line. The color displayed in the Selected Color area changes as you move the sliders. When you have the color you want to use for the background, click the GO button.
- Icon—Select an icon for visualizations representing the CI Type. The Graphics Visualization field shows the current (default) icon. Changing the icon is optional. To select an icon
- Click the Select Icon button.
- Choose from the sample icons by selecting the radio button below the icon or upload an icon of your own choosing. When you place the cursor over an icon, a pop-up gives you the item that it represents. Click the Browse button to upload an icon. When you have the icon you want to represent the CI, click the GO button.
- When you are done creating your CI, click the
 Save button. The CI name is displayed in the Existing CI Typess field and your selections for icon, background color, and text color are displayed in the Graphics Visualization area.
Edit CI Type
To edit an existing CI Type, from the CMDB homepage:
- Select Administration | CI Types. The Configure CI Types page is displayed.
- Click on the CI Type you want to edit in the Existing CI Types list to highlight it.
- Click on the Edit button. The CI Type Editor is displayed.
- From this point on, refer to Step 2 in the Create CI Type procedure above for details on the fields in the CI Types Editor.
- When you are done editing your CI, click the Save button. Any changes you have made to the icon, background color, and text color are displayed in the Graphics Visualization area.
Delete CI Type
To delete an existing CI Type, from the CMDB homepage:
- Select Administration | CI Types. The Configure CI Types page is displayed.
- Click on the CI Type you want to delete in the Existing CI Types list to highlight it.
- Click on the
 Delete button. A confirmation pop-up is displayed.
- Enter your password and then click the GO button. The Configure Configuration Item ("CI")Types window is redisplayed and the deleted CI Type no longer appears in the Existing CI Types list.
- When you are done deleting your CI, click the Save button.