Authentication
FootPrints supports
several modes of user/password authentication. You
have the option of using FootPrints'
internal encryption techniques, where FootPrints
maintains its own database of users and passwords. Alternatively,
FootPrints can let the web server
perform the authentication, or FootPrints
can authenticate by interfacing with either an LDAP directory server or
the Windows NT user list on Windows, and UNIX/Linux user list on UNIX
systems.
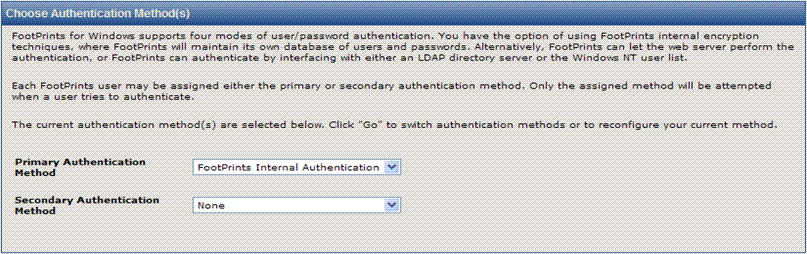
Select primary and secondary authentication methods
FootPrints supports
the following methods of password verification for FootPrints users:
- FootPrints
authentication (default)
- LDAP authentication
- Windows NT/2000 authentication
(Windows NT/2000 only)
- UNIX authentication
(UNIX only)
- Web Server Authentication
When using web server authentication with the Customer Service Portal, the customer URL provided on the Customer Service Portal setup page will not bypass customer login. If a customer goes to the regular /footprints URL, they bypass the login correctly.
To administer authentication, select Administration | System from the FootPrints Toolbar, then select Authentication under Users in the main frame.
Each FootPrints
user may be assigned either the primary or secondary authentication method.
Only the assigned method is attempted when a user tries to authenticate.
If the
secondary authentication method selected is None,
all FootPrints users are authenticated
against the primary authentication method.
There are a variety of ways to add users to the system:
- System
Administrators:
- Manually from the
Administration
| Project | Users | Add Agents page.
- Agents/Project
Administrators:
- Manually from the
Administration
| Project | Users | Add Agents page.
- Imported from a
text file; refer to Load Users from an External
File.
- Customers:
- Manually from the
Administration
| Project | Users | Add Customers option.
- Imported from a
text file; refer to Load Users from an External
File.
- Auto added to FootPrints
from the network password file (if NT/2000, LDAP or UNIX authentication
is enabled). Refer to the Auto Add Customers
option under System Administration.
- Customers can create
their own unique accounts and passwords (if FootPrints authentication
is enabled). This option is available on the Auto
Add Customers page only if FootPrints authentication is
enabled.
- If unique IDs and
passwords are not required for customers, a single shared ID and password
can be created for all customers. Customers then identify themselves
by a single unique key (the primary key), such as Email
address. If an external authentication method is selected,
the shared ID must exist in the network password file.
Authentication Methods
FootPrints Authentication (default)
When FootPrints authentication is selected, the
FootPrints password file is checked when a user logs in (passwords
are encrypted).
Windows NT/2000 Authentication
When NT/2000 Authentication is selected, the NT/2000
domain password file is used authenticate a user’s password.
To configure NT/2000
Authentication:
- Select Administration
| System | Authentication from the FootPrints
Toolbar.
- Select Windows
NT from either the Primary or Secondary Authentication drop-down list, then click
 GO.
GO.
- Fill in the NT domain
name in the box provided. Multiple domains can be added; each must
be entered on a separate line.
- Enter your Windows
network password and click GO.
Your ID and password are checked against
the domain password file. If either the ID or password isn’t
found, you receive an error message, and the change to NT authentication
is not made.
The network ID and FootPrints ID for every user
in FootPrints must be identical. For example, if the user’s
NT/2000 domain ID is jsmith,
her FootPrints ID must also be jsmith.
This must be the case for all Agent and administrator users. If
you do not require unique IDs and passwords for your employee customers
or external customers, you can create a shared ID for all customers.
That shared ID must still be present in the network password file.
Refer to the section above for more information about how customer accounts
can be created in FootPrints.
If the domain setup exists, the system correctly authenticates
against that domain. If
the domain does not exist and a guest account is enabled on the FootPrints server, any password authenticates.
To prevent
this from happening, the Guest account on the server must be disabled.
In addition,
if a guest account exists in the correctly specified domain, any login
also works with any password if the user does not exist in the domain.
LDAP Authentication
When LDAP authentication is selected, the LDAP server is used to authenticate a user’s password.
To configure LDAP
Authentication:
- Select LDAP from the Change Authentication Technique drop-down list.
- Enter the LDAP server name.
- Enter the LDAP server port (389 is the standard port). An additional option for users beside the standard LDAP port (389) is the Global Catalog port for Active Directory (3268). This enables LDAP to access additional users from trusted domains using a set of common LDAP attributes. The typical scenario in which this would be used is when a large organization has a number of offices that each maintains an Active Directory for its local users. Using the standard port, you might be able to retrieve only a local office's users. Using the Global Catalog port, you can often retrieve everyone, assuming the search base is set correctly.
- Enter the LDAP base distinguished name (DN). This is the search base for user IDs (samaccountname or uid). An example is: ou=Users, dc=server, dc=com
- If multiple DNs exist, enter each on a separate line. They are searched in order for authentication from top to bottom.
- Optionally enter login information to allow authentication, including DN and password. This can be left blank if the LDAP server allows anonymous binding.
- Enter your FootPrints password and click GO.
- Your ID and password are checked against the LDAP server. If either the ID or password is not found, you receive an error message and the change to LDAP authentication is not made.
The LDAP ID and FootPrints ID for every user in FootPrints must be identical. For example, if the user’s LDAP ID is bjones, the FootPrints ID must also be bjones. This must be the case for all Agent and administrator users. If you do not require unique IDs and passwords for your employee customers or external customers, you can create a shared ID for all customer. That shared ID must still be present in the LDAP password file. Refer to the section above for more information about how customer accounts can be created in FootPrints.
The next section of this document described how to configure LDAP security.
Configuring LDAP Security
Method of Security Used
By default, FootPrints communicates with LDAP via an unsecured connection. This topic describes how to use secured LDAP connections.
LDAP communication can be secured using Transport Layer Security (“TLS”). FootPrints uses a method called “Start TLS,” which means an initial connection is made to the LDAP server over a standard port (typically, 389). Then the connection is changed to a secured TLS connection over a standard LDAP port.
In addition to Start TLS, we have code to do an LDAP secured connection (“LDAPS”) over a secured port (typically, 636).
Setting Start TLS:
- Select Start_TLS from the LDAP Security Type dropdown.
- Select the SSL Version (if unsure, stay with the default).
- Select how you wish to handle Certificate Verification. “Require” means that FootPrints will not connect to the remote LDAP server unless the server offers a certificate, which can be compared to the certificate uploaded by the administrator. If they are the same, the connection will be made. This is the most secure method. “Optional” also requires that a certificate be uploaded, but a comparison is only made if the server offers a certificate. In the absence of the server providing a certificate, the connection will be made. “None” means that no checking of a certificate will be required and therefore no certificate must be uploaded. Although the connection will be secured, there is no verification that FootPrints is connecting with the correct server.
- If selecting “Require” or “Optional” for Certificate Verification, either a previous certificate can be used or a new one uploaded. In either case, the certificate provided must be the certificate of the certificate authority ("CA") who signed the server's certificate in PEM (Base-64) format (this will be the server's own certificate if the certificate is self-signed) . The certificate can be in any directory on the FootPrints server and can have any name, so long as it is in pem format.
Setting LDAPS:
- Select Start_TLS from the LDAP Security Type drop-down.
- Select how you wish to handle Certificate Verification. “Require” means that FootPrints will not connect to the remote LDAP server unless the server offers a certificate, which can be compared to the certificate uploaded by the administrator. If they are the same, the connection will be made. This is the most secure method. “Optional” also requires that a certificate be uploaded, but a comparison is only made if the server offers a certificate. In the absence of the server providing a certificate, the connection will be made. “None” means that no checking of a certificate will be required and therefore no certificate must be uploaded. Although the connection will be secured, there is no verification that FootPrints is connecting with the correct server.
- If selecting “Require” or “Optional” for Certificate Verification, either a previous certificate can be used or a new one uploaded. In either case, the certificate provided must be the certificate of the certificate authority ("CA") who signed the server's certificate in PEM (Base-64) format (this will be the server's own certificate if the certificate is self-signed) . The certificate can be in any directory on the FootPrints server and can have any name, so long as it is in pem format.
FootPrints secures only with server certificates, not client certificates.
Active Directory can use only LDAPS. (Refer to http://support.microsoft.com/?id=321051 for additional information.)
UNIX Authentication
When UNIX authentication is selected, the UNIX password
file is used to authenticate a user’s password. This option is only
available if FootPrints is installed on a UNIX or Linux server.
To configure UNIX
password authentication:
- Select Administration
| System | Authentication from the FootPrints
Toolbar.
- Select UNIX
from either the Primary or Secondary Authentication drop-down list, then click GO.
- Enter your FootPrints
password and click GO.
- Your ID and password
are checked against the UNIX password file. If either the ID or
password is not found, you receive an error message and the change to
UNIX authentication is not made.
No additional information needs to be defined; FootPrints
automatically finds the UNIX password file for the system. The UNIX
ID and FootPrints ID for every user in FootPrints must be
identical. For example, if the user’s UNIX ID is ebennet,
the FootPrints ID must also be ebennet.
This must be the case for all Agent and administrator users. If
you do not require unique IDs and passwords for your employee customers
or external customers, you can create a shared ID for all customers.
That shared ID must still be present in the UNIX password file.
Refer to the section above for more information about how customer accounts
can be created in FootPrints.
Web Server Authentication
In this method, password checking is handled by the web
server, not FootPrints.
To enable this feature:
- Select Administration
| System | Authentication from the FootPrints
Toolbar.
- Select Web
Server Authentication from the drop-down list.
- Click GO.
- In order to put the
web server in charge of passwords, anonymous access must first be taken
away from the five FootPrints web aliases: "footprints", "MRcgi",
"help", "MRimg", and "tmp". If
the webserver is dedicated to running just FootPrints,
you can disallow anonymous access on the whole site, instead of setting
permissions on each alias.
On Windows:
- In
IIS, right-click the alias (or the whole site), go to its properties,
and disallow anonymous access.
On UNIX/Apache:
If anonymous access is disallowed, when the user tries
to access the FootPrints login:
- If the user is logged
into the Windows domain where the web server runs, the user is considered
authenticated already
or
- The user is prompted
for the network/web access name and password by a dialog spawned from
the web browser.
The user's password is authenticated according to the
configuration of the web server. The
FootPrints user ID must be identical to the user ID authenticated by the
web server or access is not granted.
If Web Authentication is used, it must be the only authentication
method; it cannot be combined with any other authentication method.
Switching Back to FootPrints Authentication
If Windows NT/2000, LDAP, or UNIX authentication is chosen,
then new users are created in FootPrints,
and then the authentication method is switched back to FootPrints,
the users’ passwords default to their user IDs. Users who
were added to FootPrints before
switching to an alternative authentication method retain their original
FootPrints passwords.