Attributes
Create the set of attributes for CI Types and associate them with CI Types.
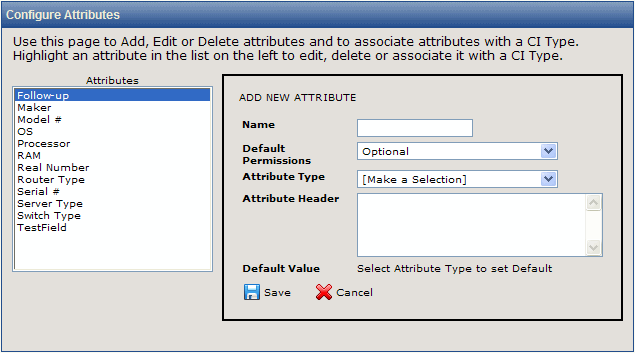
Create an Attribute
To create an attribute, from the CMDB homepage:
- Select Administration | Attributes. The Configure Attributes page is displayed.
- Next to the Attributes field, click the
 Add button. The Attribute Editor is displayed.
The fields and actions you can take in this area are as follows:
- Name—Enter a name for the attribute in the Name field. For example, you might enter "Vendor". It is mandatory that you enter a name in this field.
- Default Permissions—This is different from setting Permissions (which is done from the Administration | CI Types selection. Default Permissions sets the default
permission so that if an attribute is added to many types at once, that instance
of the attribute will be added as Mandatory or Optional per this setting.
- Attribute
Type—This
defines the type of data the field accepts. Refer to Field Types for descriptions.
- Attribute Header—If you would like to include instructions or other information
about attribute fields when they are displayed, you can optionally insert text or HTML headers above
the field. Enter the text or HTML into the Field Header field. For example, you might include an HTML href in this field linking to a company intranet page, or you might include text that describes the field contents or gives the user instructions.
- Default Value—A default value is either entered or displayed here, depending on the field type. For example, if you select a character field type, you can enter a default value for that field here. If you select a drop-down field type, the default value is entered when the drop-down field is displayed in a field provided for that purpose. All field types can have a default value except for Multi-Select fields. In addition, the default choices for Date and Date Time fields are limited to No Default and Today. For Date Time fields, Today means the day and time at which the attribute was saved).
- When you have completed entering the attribute information, click the
 Save button to save the attribute. The attribute is then displayed in the Attributes
field.
Save button to save the attribute. The attribute is then displayed in the Attributes
field.
Edit an Attribute
To edit an attribute, from the CMDB homepage:
- Select Administration | Attributes. The Configure Attributes page is displayed.
- Click on the attribute you wish to edit in the Attributes field and then click the
 Edit button. The Attribute Editor is displayed.
- Refer to the instructions above in Create an Attribute, Step 2 for further details.
Delete an Attribute
To delete an attribute, from the CMDB homepage:
- Select Administration | Attributes. The Configure Attributes page is displayed.
- Click on the attribute you wish to delete in the Attributes field and then click the
 Delete button. A confirmation pop-up window is displayed into which you must enter your password in order to complete the deletion.
- Enter your password and click the
 GO button. The attribute is deleted and is no longer displayed in the Attributes field.
Associate an Attribute with a CI Type
Attributes make sense in association with CI Types. For example, you wouldn't want to have data for a "Vendor" when the CI Type is "Location" or to have "License Plate Number" data for a CI Type of "Router". Once you have created the attributes, you must specify the CI Types with which they will appear.
To associate an attribute with a CI Type, from the CMDB homepage:
- Select Administration | Attributes. The Configure Attributes page is displayed.
- In the Attributes field, click on the CI Type for which you want to create an association.
- Next to the Attributes field, click the Select CI Types button. The Select CI Types area is displayed beneath the Attributes field.
- Click on the CI Type you want to associate with the attribute in the All CI Types field. You can select multiple CI Types by using the left mouse button in conjunction with the Shift or CTRL keys.
- Click the
 Add button. The CI Type(s) you added are displayed in the Associated CI Types field.
- Click the Save button. The Associated CI Types area is redisplayed and the CI Type(s) you added are shown in the list.
Remove an Attribute Association with a CI Type
To remove an attribute association with a CI Type, from the CMDB homepage:
- Select Administration | Attributes. The Configure Attributes page is displayed.
- In the Attributes field, click on the CI Type from which you want to remove the association.
- Next to the Attributes field, click the Select CI Types button. The Select CI Types area is displayed beneath the Attributes field.
- In the Associated CI Types field, click on the CI Type you want to disassociate from the attribute. You can select multiple CI Types by using the left mouse button in conjunction with the Shift or CTRL keys.
- Click the Delete button. The CI Type(s) you disassociated is removed from the Selected CI Types field.
- Click the Save button. The Selected CI Types area is redisplayed and the CI Type(s) you removed is no longer in the list.